DIAGRAMA OSPF- MULTIAREA
Nota
Los 6 routers cuentan con su configuración de fabrica, el primer paso es acceder por romon a todos los routers, en este caso se esta accediendo mediante el virtualizador GNS3, pero de igual manera se pude realizar mediante EVE-NG
Se recomienda cambiar el nombre de los RB para poder identificarlos desde SYSTEM > IDENTITY
Desde la terminal se realiza con la siguiente línea:/system identity set name = RA
Para activar el romon lo realizamos desde TOOL > RoMON y seleccionamos enable
También se puede realizar por la terminal con el siguiente comando:tool romon set enable=yes
Ya con esto ya podemos acceder a los demás RB
Ahora revisamos que RB tenemos de vecinos
Y se puede observar que aparecen los RB conectamos pero aun no tienen cambiado el nombre y no tienen activado romon
Nota
Podemos acceder a los routers vecinos desde la mikrotik RA dándole clic derecho e ingresando por MAC Telnet
Y ahora ya podemos ingresar para poder activar el romon poder acceder desde winbox y cambiar el nombre.
Archivo adjunto 3349
Cambiamos los nombres de los RB y de las interfaces interfaces (opcional) esto para poder identificar mejor al momento de configurar.
Archivo adjunto 3350
Una vez cambiando los nombres podemos identificar a los RB de una mejor manera
Archivo adjunto 3351
Y ahora renombramos las interfaces en interface list, para una mejor guía al momento de configurar (opcional). Quedando de la siguiente manera
Archivo adjunto 3352
Configuramos OSPF
SE CREAN BRIDGES Y AGREGAMOS LAS IPS
- Creamos la interfaz loopback, que es un brigde vacío sin ningún puerto con el nombre loopback
Aplicamos
- agregamos las IP
Agregamos una ip al loopback que es el mismo valor que el router ID
Agregamos las demás interfacez
- Creamos un bridge que se va a llamar LAN para conectar a los clientes
Aplicamos
Y le asignamos los puertos que no quedan
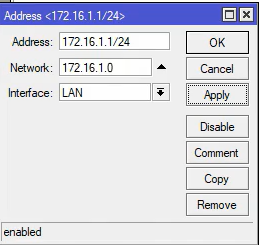
Agregamos la dirección de la LAN

HABILITAMOS LOS SERVICOS DEL PARAMETRO OSPF
Nos dirigimos en Routing > OSPF
- Agregar las redes OSPF
Nota
Las redes ospf van a ser todas las redes que nos están comunicando con OSPF únicamente
Para RA únicamente están conectamos RB y RC
Hay que agregar el network ID o direccion de red
Dirección que nos comunica hacia RB
Dirección que nos comunica hacia RC
2. Configuramos instancia
Nota
Configuramos la instancia default con la misma ip que se lo coloco al loopback en router ID que en este caso es 0.0.0.1
redistribuimos la ruta por defecto en – redistribute default route como if installed (as type 1)
Redistribute connected route lo colocamos como as type 1
Redistribute static route lo colocamos como as type 1
Redistribute other OSPF route lo colocamos como as type 1
Aplicamos
Agregamos interfaz
Nota
Cuando se agregan las redes automáticamente se agregan las interfaces, pero hay parámetros que se deben modificar y no permite por que se generan de manera dinámica
Si observamos las interfaces nos aparecen con una letra D a la izquierda, lo que nos indica que se generaron de manera dinámica.
Para la interfaz ether2_to_RB
Nota
Hay que agregar de manera manual las mismas interfaces para que nos permita modificar el network type: point to point y de igual manera así ya nos permite modificar el costo, que dando de la siguiente manera
Si vemos ahora ya no está la interfaz dinámica (la que aparecía con D)
Realizamos el mismo proceso para la interfaz ether3_to_RC
Así ambas interfaces ya estén en point to point
Nota
Esta es la configuración primordial que todo router OSPF tiene que tener y ahora se realizaran las configuraciones de la misma manera en los demás routers
Quedando las configuraciones para cada router de la siguiente manera con líneas de comando
RA
/interface bridge

add name=LAN

add name=Loopback

/interface ethernet

set [ find default-name=ether2 ] name=ether1

set [ find default-name=ether3 ] name=ether2_to_RB

set [ find default-name=ether4 ] name=ether3_to_RC

set [ find default-name=ether5 ] name=ether4

set [ find default-name=ether6 ] name=ether5

set [ find default-name=ether1 ] name=ether6

/interface wireless security-profiles

set [ find default=yes ] supplicant-identity=MikroTik

/routing ospf instance

set [ find default=yes ] distribute-default=if-installed-as-type-1 \

    redistribute-connected=as-type-1 redistribute-other-ospf=as-type-1 \

    redistribute-static=as-type-1 router-id=0.0.0.1

/interface bridge port

add bridge=LAN interface=ether4

add bridge=LAN interface=ether5

add bridge=LAN interface=ether1

/ip address

add address=0.0.0.1 interface=Loopback network=0.0.0.1

add address=10.1.1.1/30 interface=ether2_to_RB network=10.1.1.0

add address=10.1.1.10/30 interface=ether3_to_RC network=10.1.1.8

add address=172.16.1.1/24 interface=ether1 network=172.16.1.0

/ip dhcp-client

# DHCP client can not run on slave interface!

add disabled=no interface=ether5

/ip dns

set servers=8.8.8.8,8.8.4.4

/routing ospf interface

add cost=100 interface=ether2_to_RB network-type=point-to-point

add interface=ether3_to_RC network-type=point-to-point

/routing ospf network

add area=backbone network=10.1.1.0/30

add area=backbone network=10.1.1.8/30

/system identity

set name=RA

/tool romon

set enabled=yes
RB
/interface bridge

add name=LAN

add name=Loopback

/interface ethernet

set [ find default-name=ether2 ] name=ether2_to_RD

set [ find default-name=ether3 ] name=ether3_to_RC

set [ find default-name=ether4 ] name=ether4_to_RA

/interface wireless security-profiles

set [ find default=yes ] supplicant-identity=MikroTik

/routing ospf instance

set [ find default=yes ] distribute-default=if-installed-as-type-1 \

    redistribute-connected=as-type-1 redistribute-other-ospf=as-type-1 \

    redistribute-static=as-type-1 router-id=0.0.0.2

/interface bridge port

add bridge=LAN interface=ether1

add bridge=LAN interface=ether5

/ip address

add address=0.0.0.2 interface=Loopback network=0.0.0.2

add address=172.16.2.1/24 interface=LAN network=172.16.2.0

add address=10.1.1.2/30 interface=ether4_to_RA network=10.1.1.0

add address=10.1.1.5/30 interface=ether3_to_RC network=10.1.1.4

add address=10.1.1.25/30 interface=ether2_to_RD network=10.1.1.24

/ip dhcp-client

# DHCP client can not run on slave interface!

add disabled=no interface=ether1

/routing ospf interface

/routing filter

add action=discard chain=ospf-out prefix=172.16.2.0/24

add interface=ether4_to_RA network-type=point-to-point

add cost=100 interface=ether3_to_RC network-type=point-to-point

add cost=100 interface=ether2_to_RD network-type=point-to-point

/routing ospf network

add area=backbone network=10.1.1.0/30

add area=backbone network=10.1.1.4/30

add area=backbone network=10.1.1.24/30

/system identity

set name=RB

/tool romon

set enabled=yes
RC
/interface bridge

add name=LAN

add name=Loopback

/interface ethernet

set [ find default-name=ether2 ] name=ether1_to_RA

set [ find default-name=ether3 ] name=ether2_to_RB

set [ find default-name=ether4 ] name=ether3_to_RD

set [ find default-name=ether5 ] name=ether4

set [ find default-name=ether6 ] name=ether5

set [ find default-name=ether1 ] name=ether6

/interface wireless security-profiles

set [ find default=yes ] supplicant-identity=MikroTik

/routing ospf instance

set [ find default=yes ] distribute-default=if-installed-as-type-1 \

    redistribute-connected=as-type-1 redistribute-other-ospf=as-type-1 \

    redistribute-static=as-type-1 router-id=0.0.0.3

/interface bridge port

add bridge=LAN interface=ether4

add bridge=LAN interface=ether5

/ip address

add address=0.0.0.3 interface=Loopback network=0.0.0.3

add address=172.16.3.1/24 interface=LAN network=172.16.3.0

add address=10.1.1.9/30 interface=ether1_to_RA network=10.1.1.8

add address=10.1.1.6/30 interface=ether2_to_RB network=10.1.1.4

add address=10.1.1.30/30 interface=ether3_to_RD network=10.1.1.28

/ip dhcp-client

add disabled=no interface=ether1_to_RA

/routing ospf interface

add cost=100 interface=ether1_to_RA network-type=point-to-point

add interface=ether2_to_RB network-type=point-to-point

add interface=ether3_to_RD network-type=point-to-point

/routing ospf network

add area=backbone network=10.1.1.8/30

add area=backbone network=10.1.1.4/30

add area=backbone network=10.1.1.28/30

/system identity

set name=RC

/tool romon

set enabled=yes
RD
Nota
RD tiene conexión hacia el área backbone pero también tiene conexión hacia el área 1
/interface bridge

add name=LAN

add name=Loopback

/interface ethernet

set [ find default-name=ether1 ] name=ether1_to_RB

set [ find default-name=ether2 ] name=ether2_to_RE

set [ find default-name=ether3 ] name=ether3_to_RF

set [ find default-name=ether4 ] name=ether4_to_RC

/interface wireless security-profiles

set [ find default=yes ] supplicant-identity=MikroTik

/routing ospf area

add area-id=0.0.0.1 name=area1

/routing ospf instance

set [ find default=yes ] distribute-default=if-installed-as-type-1 \

    redistribute-connected=as-type-1 redistribute-other-ospf=as-type-1 \

    redistribute-static=as-type-1 router-id=0.0.0.4

/interface bridge port

add bridge=LAN interface=ether5

/ip address

add address=0.0.0.4 interface=Loopback network=0.0.0.4

add address=172.16.4.1/24 interface=LAN network=172.16.4.0

add address=10.1.1.26/30 interface=ether1_to_RB network=10.1.1.24

add address=10.1.1.29/30 interface=ether4_to_RC network=10.1.1.28

add address=10.1.1.13/30 interface=ether3_to_RF network=10.1.1.12

add address=10.1.1.22/30 interface=ether2_to_RE network=10.1.1.20

/ip dhcp-client

add disabled=no interface=ether1_to_RB

/routing ospf interface

add interface=ether1_to_RB network-type=point-to-point

add cost=100 interface=ether4_to_RC network-type=point-to-point

add interface=ether3_to_RF network-type=point-to-point

add cost=100 interface=ether2_to_RE network-type=point-to-point

/routing ospf network

add area=backbone network=10.1.1.24/30

add area=backbone network=10.1.1.28/30

add area=area1 network=10.1.1.12/30

add area=area1 network=10.1.1.20/30

/system identity

set name=RD

/tool romon

set enabled=yes
RE
/interface bridge

add name=LAN

add name=Loopback

/interface ethernet

set [ find default-name=ether2 ] name=ether1

set [ find default-name=ether3 ] name=ether2_to_RD

set [ find default-name=ether4 ] name=ether3_to_RF

set [ find default-name=ether5 ] name=ether4

set [ find default-name=ether6 ] name=ether5

set [ find default-name=ether1 ] name=ether6

/interface wireless security-profiles

set [ find default=yes ] supplicant-identity=MikroTik

/routing ospf area

add area-id=0.0.0.1 name=area1

/routing ospf instance

set [ find default=yes ] distribute-default=if-installed-as-type-1 \

    redistribute-connected=as-type-1 redistribute-other-ospf=as-type-1 \

    redistribute-static=as-type-1 router-id=0.0.0.6

/interface bridge port

add bridge=LAN interface=ether1

add bridge=LAN interface=ether4

add bridge=LAN interface=ether5

/ip address

add address=0.0.0.6 interface=Loopback network=0.0.0.6

add address=172.16.6.1/24 interface=LAN network=172.16.6.0

add address=10.1.1.21/30 interface=ether2_to_RD network=10.1.1.20

add address=10.1.1.18/30 interface=ether3_to_RF network=10.1.1.16

/ip dhcp-client

# DHCP client can not run on slave interface!

add disabled=no interface=ether1

/routing ospf interface

add interface=ether2_to_RD network-type=point-to-point

add cost=100 interface=ether3_to_RF network-type=point-to-point

/routing ospf network

add area=area1 network=10.1.1.20/30

add area=area1 network=10.1.1.16/30

/system identity

set name=RE

/tool romon

set enabled=yes
RF
/interface bridge

add name=LAN

add name=Loopback

/interface ethernet

set [ find default-name=ether1 ] name=ether1_to_RE

set [ find default-name=ether4 ] name=ether3

set [ find default-name=ether5 ] name=ether4

set [ find default-name=ether6 ] name=ether5

set [ find default-name=ether3 ] name=ether6_to_RD

/interface wireless security-profiles

set [ find default=yes ] supplicant-identity=MikroTik

/routing ospf area

add area-id=0.0.0.1 name=area1

/routing ospf instance

set [ find default=yes ] distribute-default=if-installed-as-type-1 \

    redistribute-connected=as-type-1 redistribute-other-ospf=as-type-1 \

    redistribute-static=as-type-1 router-id=0.0.0.5

/interface bridge port

add bridge=LAN interface=ether2

add bridge=LAN interface=ether3

add bridge=LAN interface=ether4

add bridge=LAN interface=ether5

/ip address

add address=0.0.0.5 interface=Loopback network=0.0.0.5

add address=172.16.5.1/24 interface=LAN network=172.16.5.0

add address=10.1.1.14/30 interface=ether6_to_RD network=10.1.1.12

add address=10.1.1.17/30 interface=ether1_to_RE network=10.1.1.16

/ip dhcp-client

add disabled=no interface=ether1_to_RE

/routing ospf interface

add interface=ether1_to_RE network-type=point-to-point

add cost=100 interface=ether6_to_RD network-type=point-to-point

/routing ospf network

add area=area1 network=10.1.1.12/30

add area=area1 network=10.1.1.16/30

/system identity

set name=RF

/tool romon

set enabled=yes
Nota
una vez configuradas podremos ver las rutas de OSPF
Por ejemplo en el router RF , estan las rutas de toda la red.
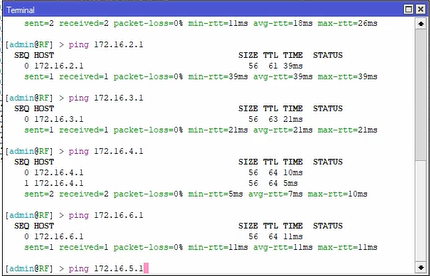
Si se realiza ping a la red LAN del primer router 172.16.1.1 se deberá realizar correctamente
de igual manera realizamos un ping a:
172.16.2.1 que es RB
172.16.3.1 que es RC
172.16.4.1 que es RD
172.16.6.1 que es RE
y 172.16.5.1 que es la red dentro de RF
se realiza el ping correctamente

Nota
De esta manera se ha logrado conectividad a todos los routers en la red OSPF con una red multitarea y diferentes costos


 Gracias:
  Me agrada:
  Me desagrada:


 Citar
Citar