Laboratorio BGP ipv6 y subneteo
El subneteo es el proceso de dividir una red grande en redes más pequeñas llamadas subredes.Esto se hace para organizar mejor una red, mejorar el rendimiento y la seguridad, aprovechando mejor las direcciones IP.
Descripción
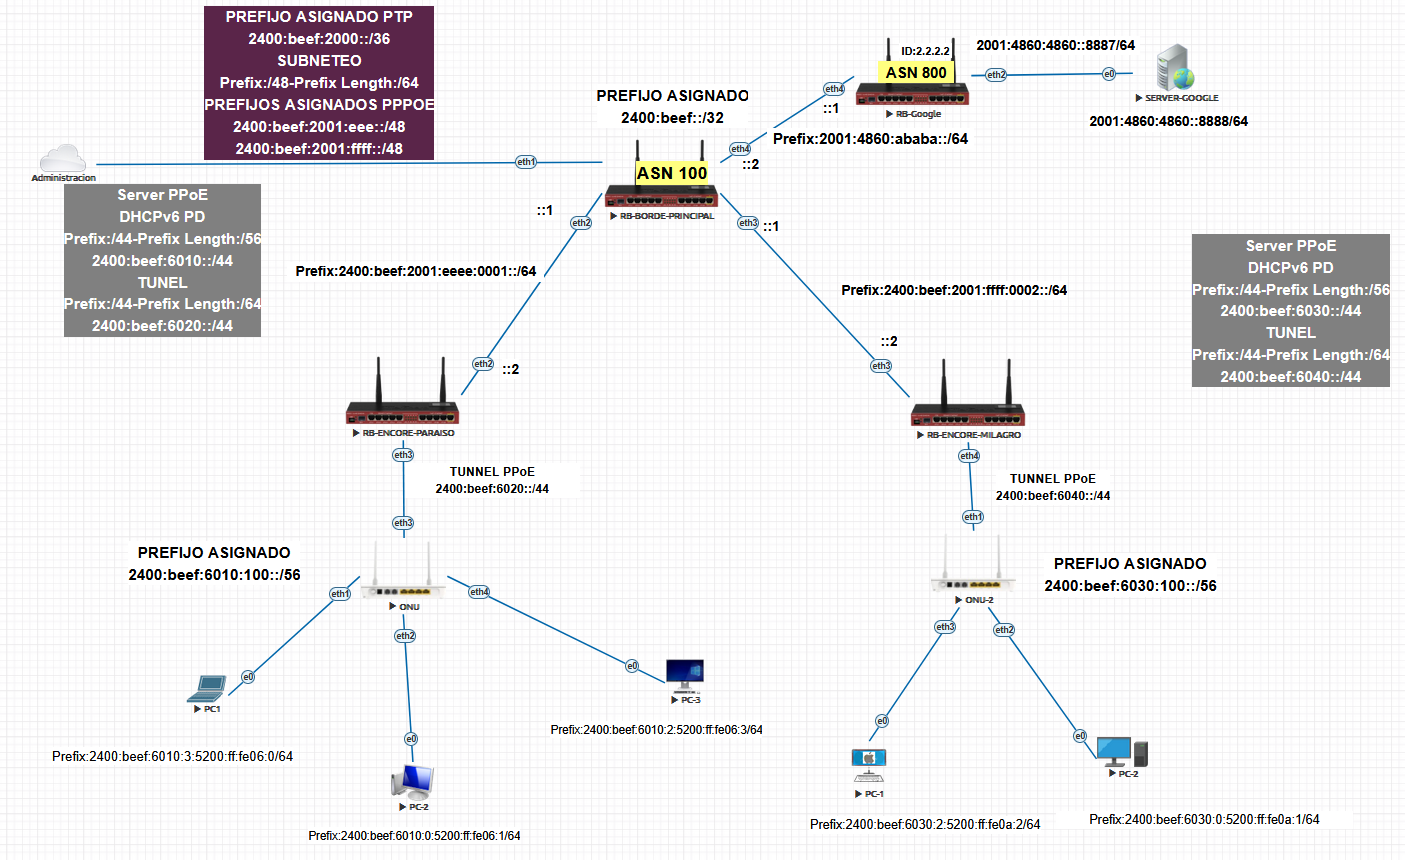
Vamos a crear un laboratorio en EVE-ng de acuerdo a la topología para Implementar el protocolo BGP IPv6 realizando el subneteo de un /32 hasta llegar a un /64 para practicar enrutamiento y segmentación de redes.
PASO1 Crear laboratorio en EVE-NG
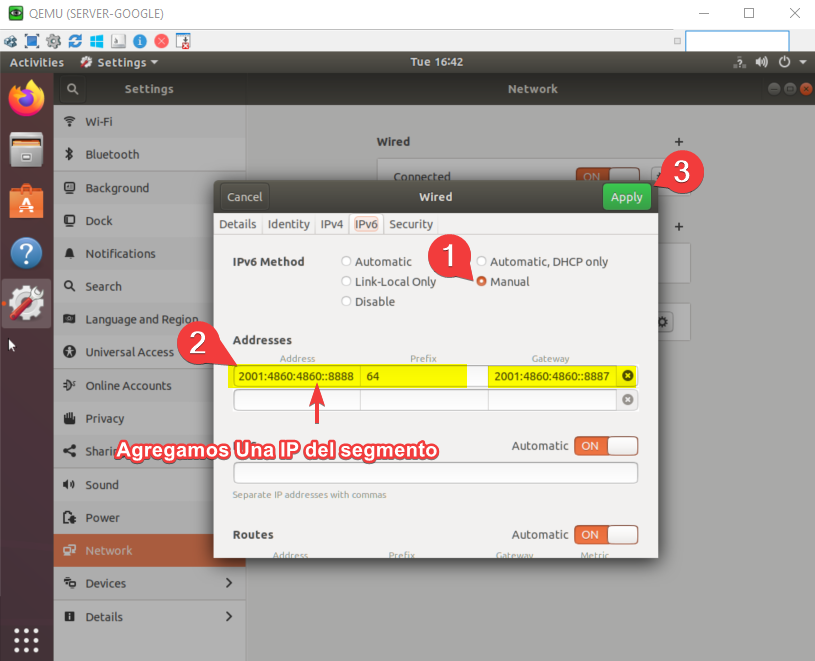
PASO 2Configuración del SERVIDOR GOOGLE
Configure la red que usara el servidor de google
Nota
ADVERTENCIA
Se configura el SERVIDOR GOOGLE por fines de la practica, En la vida real es independiente de nosotros
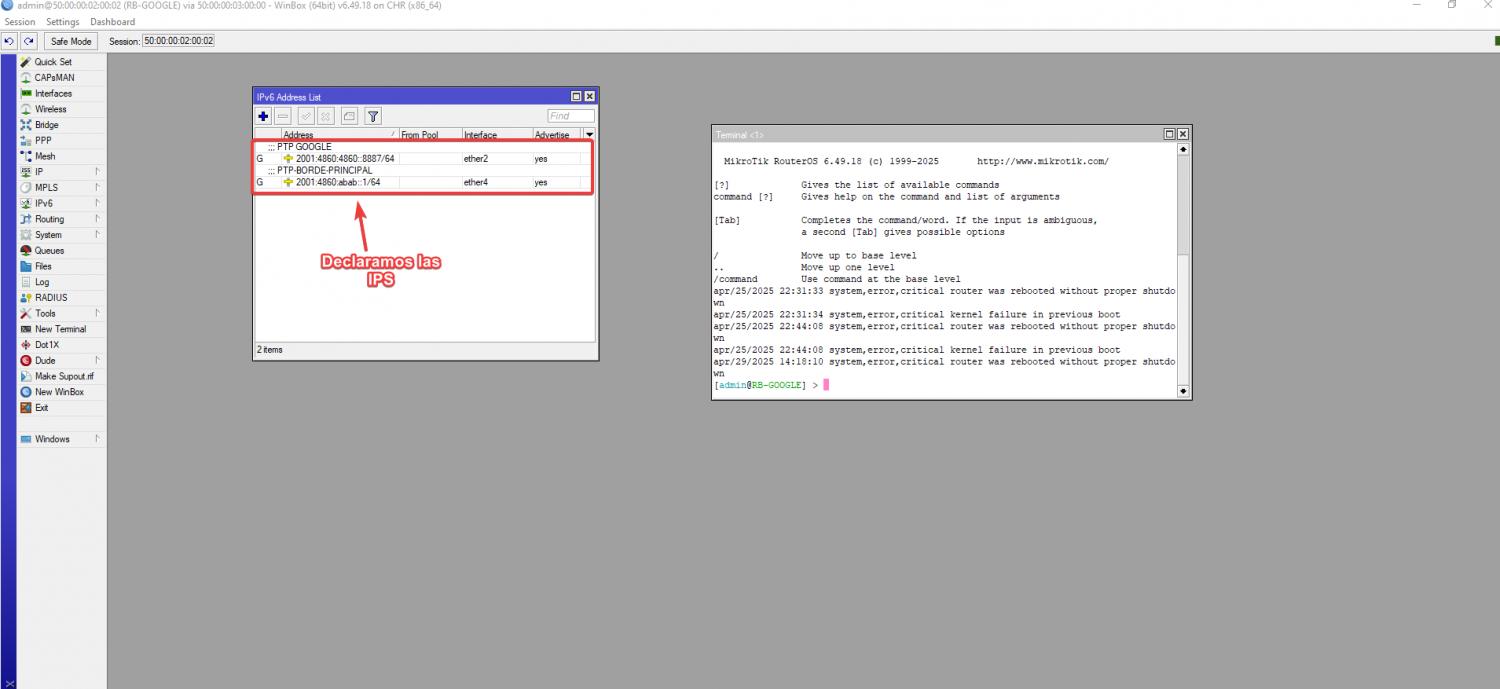
PASO 2.1Configuración del ROUTER GOOGLE
Configure las ips que irán en cada una de las interfaces Ethernet de cada router, de acuerdo a la topología
Por comandos
/ipv6 address

add address=2001:4860:4860::8887 comment="PTP GOOGLE" interface=ether2

add address=2001:4860:abab::1 comment=PTP-BORDE-PRINCIPAL interface=ether4
Por Interfaz
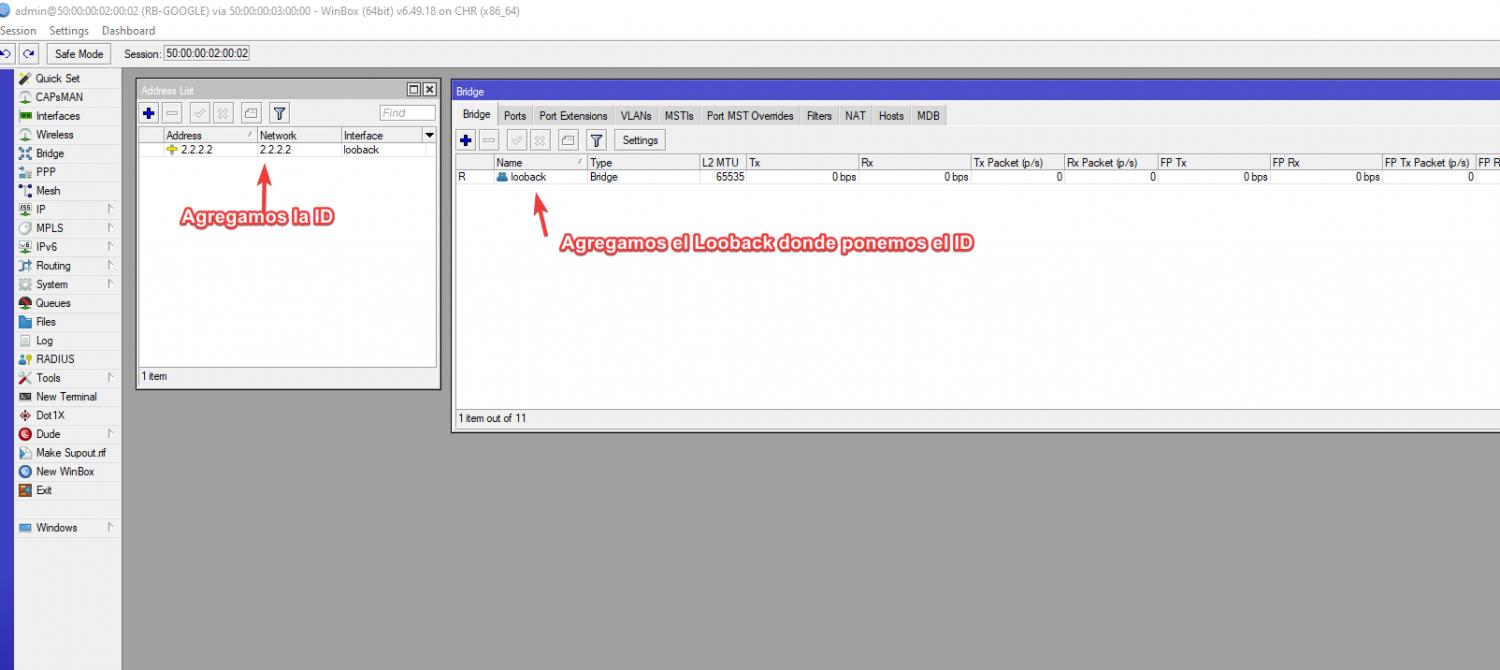
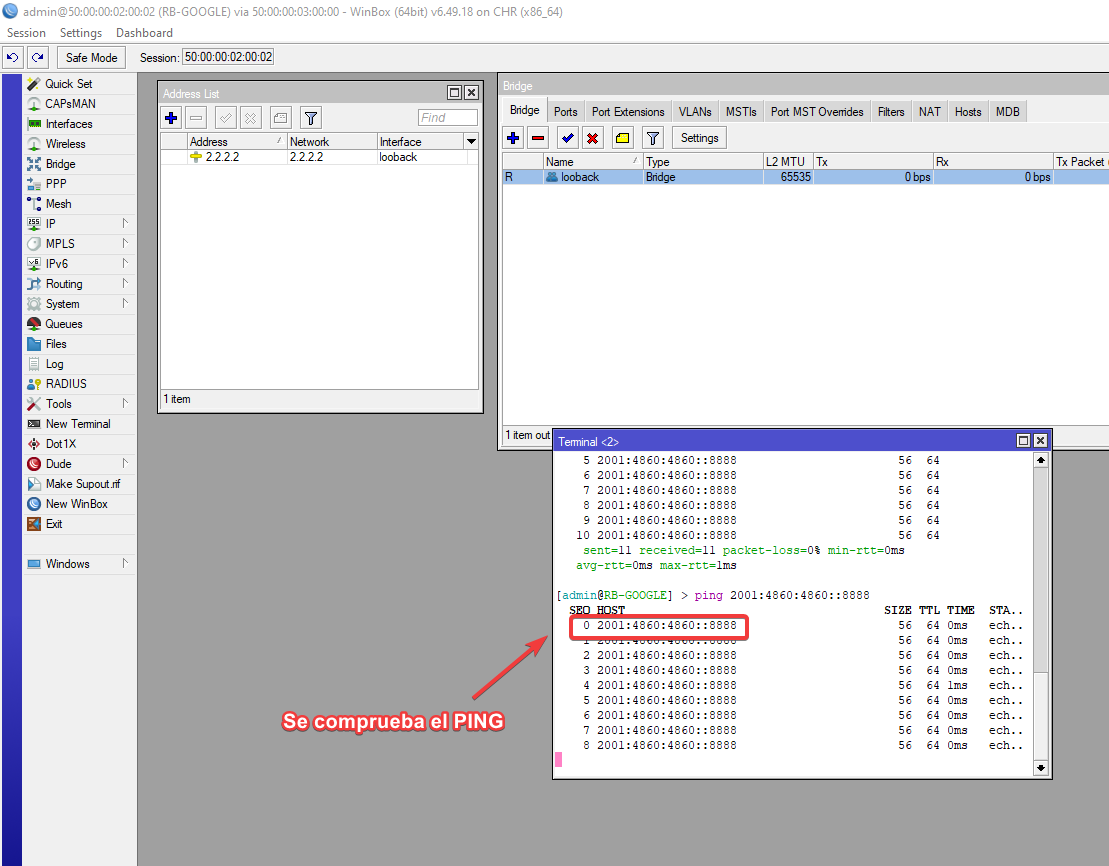
Agregamos un ID que nos ayudara con la sesión Establecida del BGP .Creamos primero un bridge que simule un Looback y agregamos la dirección 2.2.2.2 a la interfaz de ese Looback
Por comandos
/interface bridge

add name=looback

/ip address

add address=2.2.2.2 interface=looback network=2.2.2.2
Por Interfaz
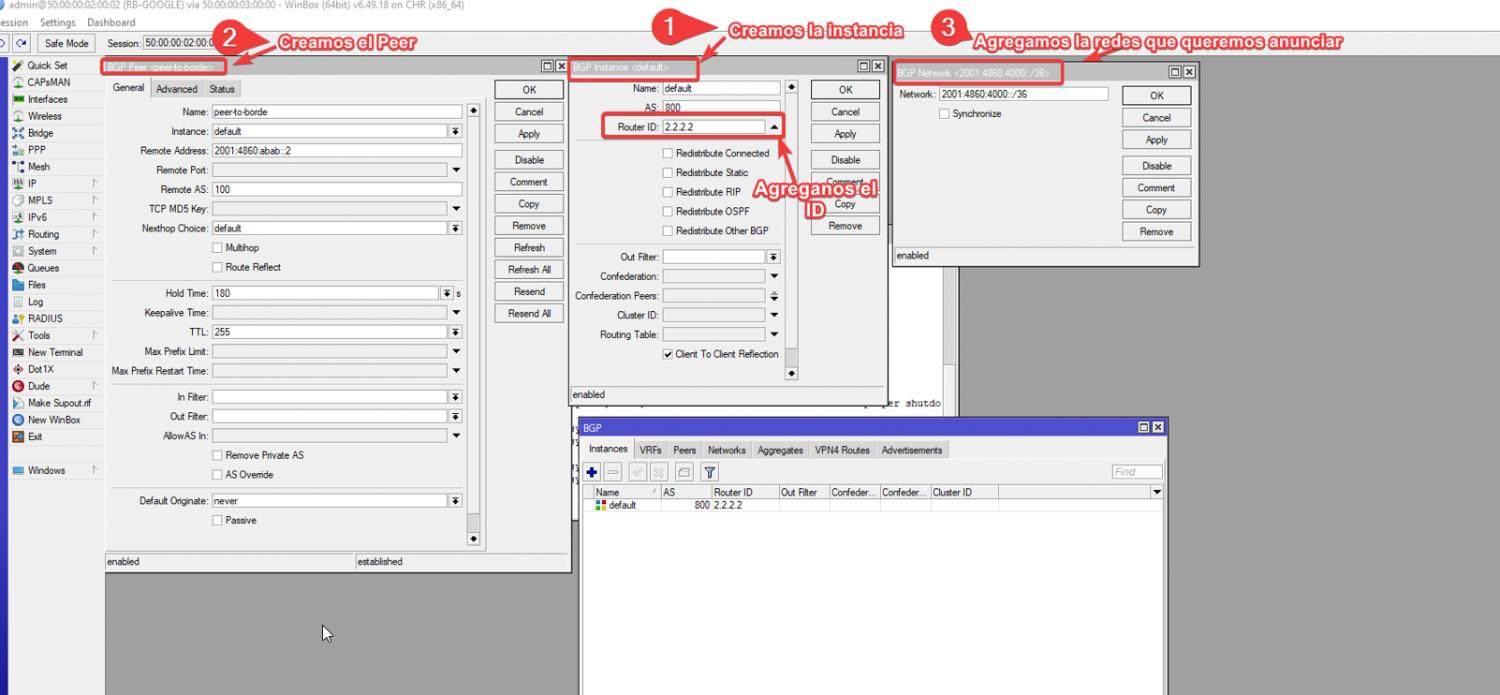
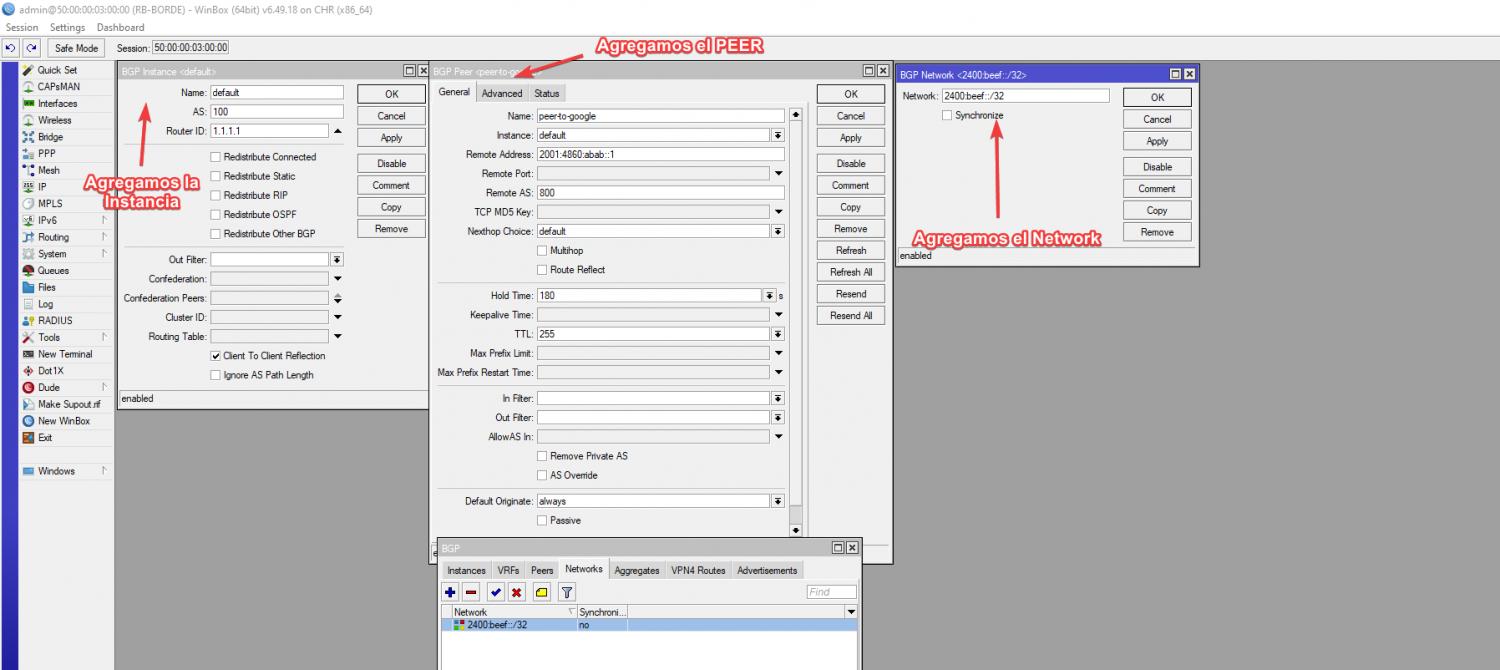
PASO2.2Configuración básica de BGP ROUTER GOOGLE
vamos a configurar la instancia, el peer y el network del RB, Recuerda que vamos a configurar el ID en la instancia ya que si no , la sesion no sera establecida
- Interfaz de red: 2001:4860:abab::1
- AS: 800
- Vecino BGP: 2001:4860:abab::2
- AS Vecino 100
Por comandos
/

routing bgp instance

set default as=800 router-id=2.2.2.2

/routing bgp network

add network=2001:4860:4000::/36 synchronize=no

add network=2001:4860:abab::/64 synchronize=no

/routing bgp peer

add address-families=ipv6 name=peer-to-borde remote-address=2001:4860:abab::2 \

remote-as=100 update-source=ether4
Por interfaz
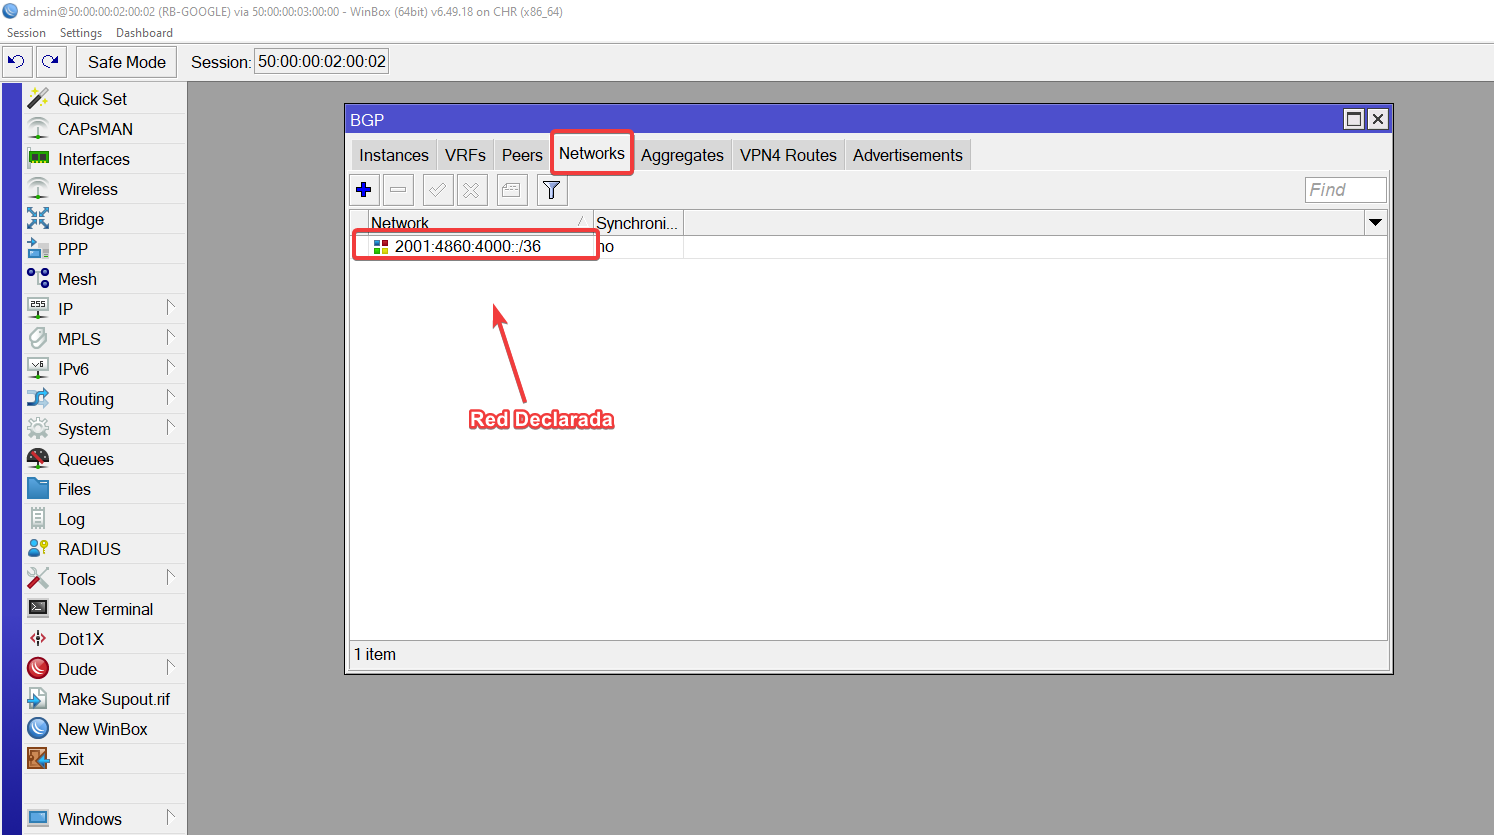
Declaramos los prefijos que usara el RB-GOOGLE en networks
Nota
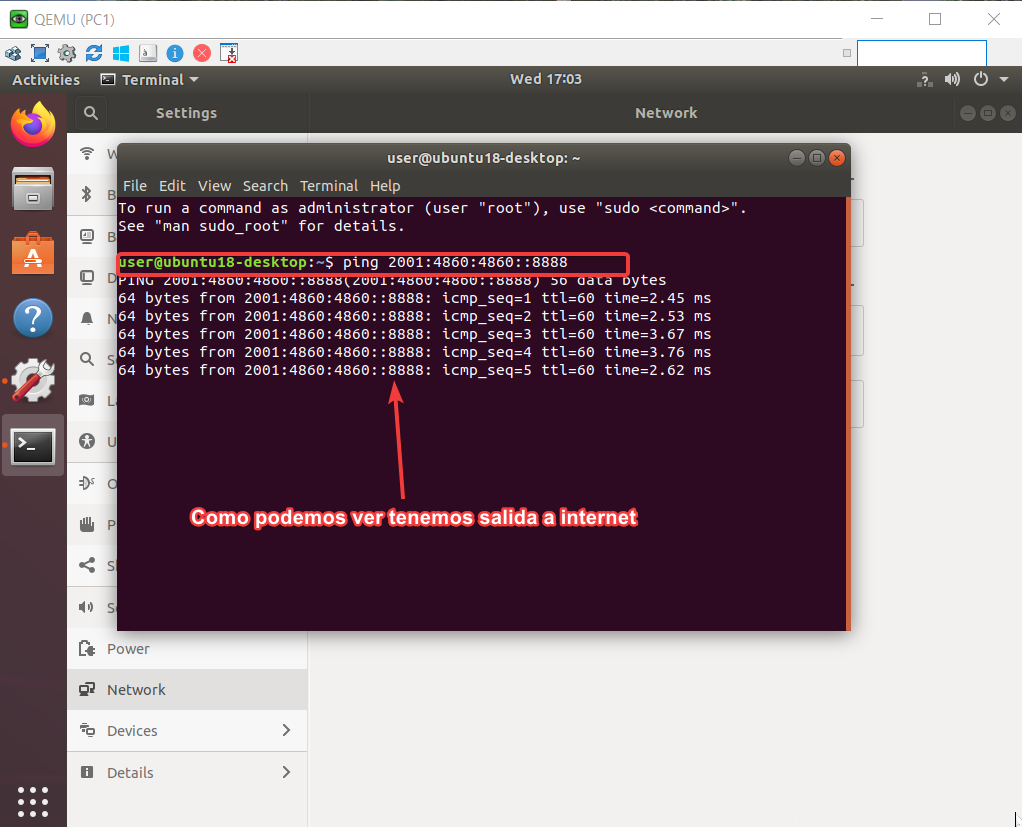
Verificamos que tengamos internet
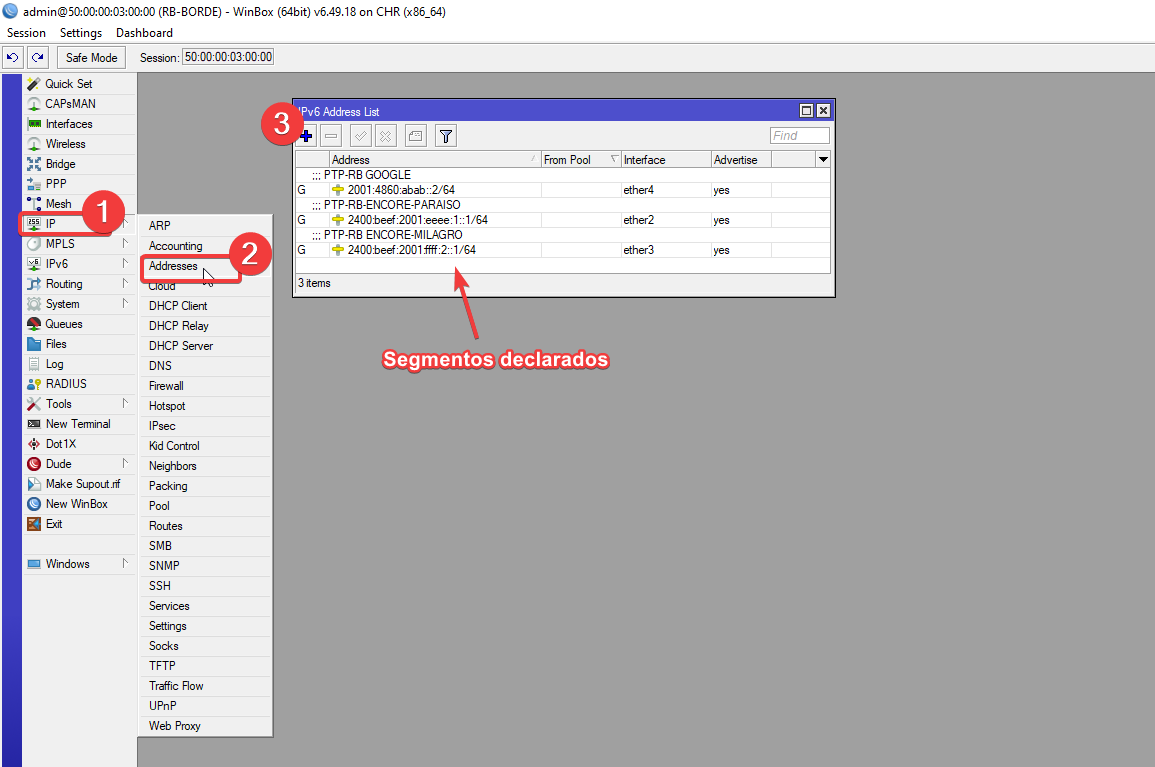
PASO 3Configuración del ROUTER BORDE PRINCIPAL
Configure las ips que irán en cada una de las interfaces Ethernet de cada router, de acuerdo a la topología, Es muy importante que cuando realices el Supneteo utilices diferentes prefijos /64
Nota
Por buenas practicas los punto a punto deben ser /64
Prefijo asignado por lanic
2400:beef::/32
ID:1.1.1.1
Por comandos
/ipv6 address

add address=2001:4860:abab::2 comment="PTP-RB GOOGLE" interface=ether4

add address=2400:beef:2001:ffff:2::1 comment="PTP-RB ENCORE-MILAGRO" \

    interface=ether3

add address=2400:beef:2001:eeee:1::1 comment=PTP-RB-ENCORE-PARAISO interface=\

    ether2
Por Interfaz
PASO[3.1Configuración básica de BGP ROUTER BORDE
vamos a configurar la instancia, el peer y el network del RB
- Interfaz de red: 2001:4860:abab::2
- AS: 100
- Vecino BGP: 2001:4860:abab::1
- AS Vecino 800
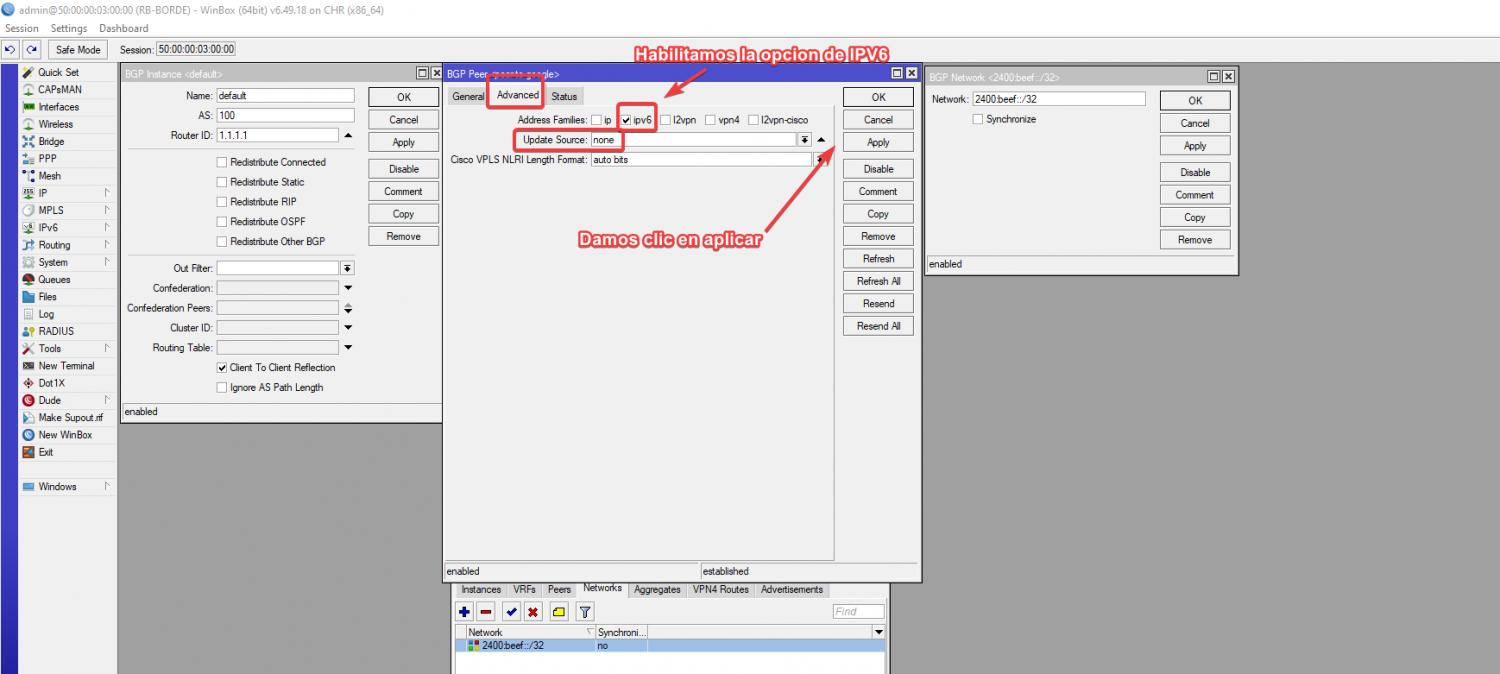
Nota
Muy importante para que se puedan propagar los prefijos es nesesario habilitar la casilla IPV6
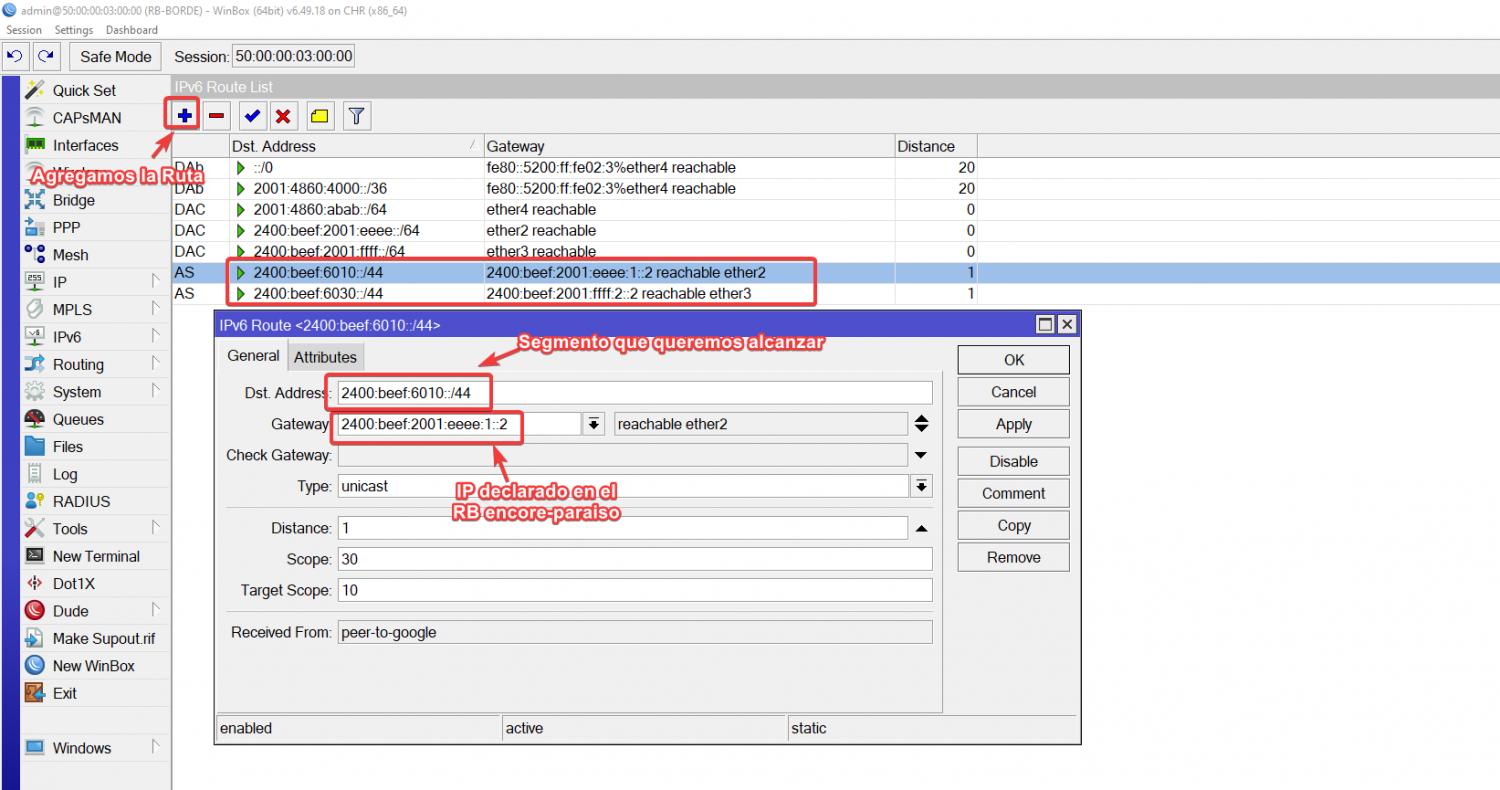
PASO[3.2Configuración de rutas en RB BORDE PRINCIPAL
vamos a configurar las rutas del RB BORDE para que el ENCORE-PARAISO Y ENCORE-MILAGRO puedan conocer el prefijo atravez de sus redes PTP y puedan propagar con los clientes finales
Por comandos
/ipv6 route

add distance=1 dst-address=2400:beef:6010::/44 gateway=2400:beef:2001:eeee:1::2

/ipv6 route

add distance=1 dst-address=2400:beef:6010:/44 gateway=2400:beef:2001:ffff:2::2
Por interfaz
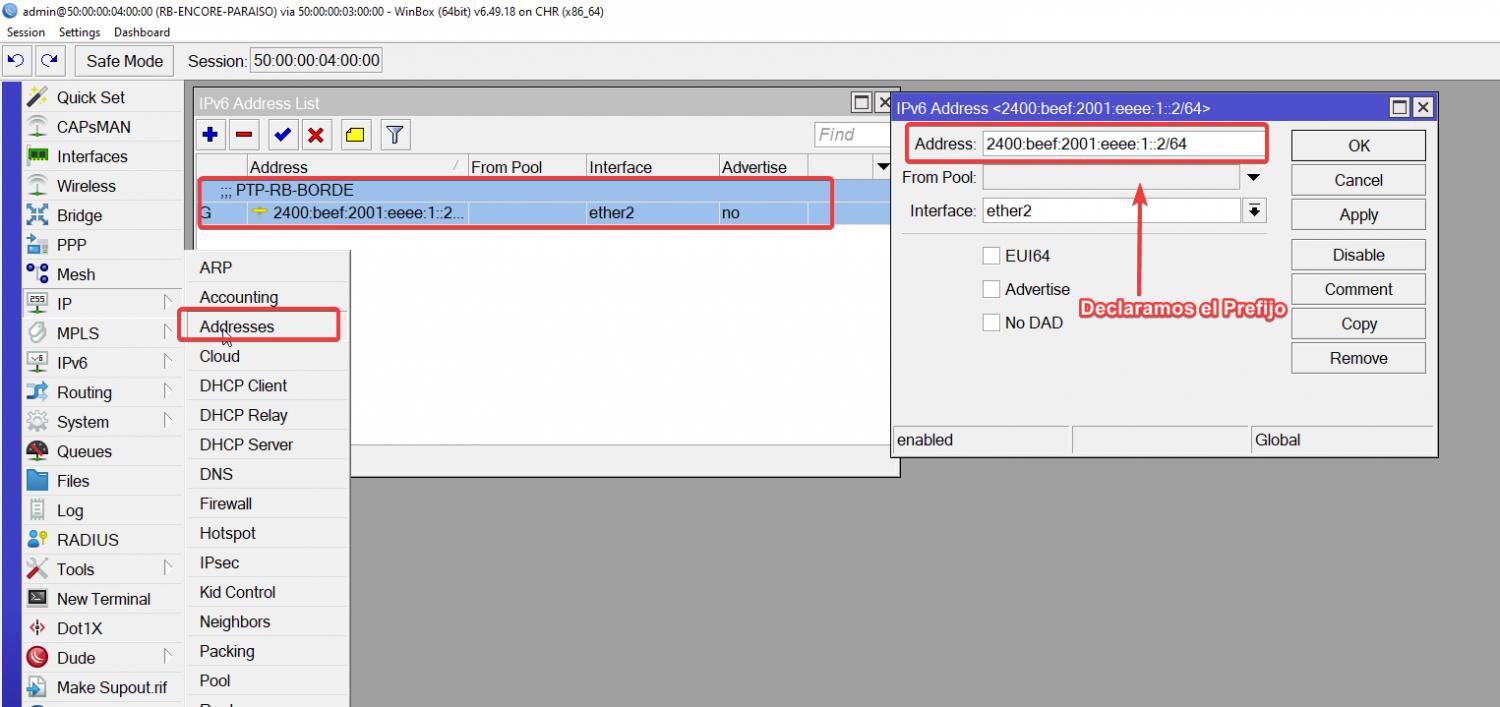
PASO 4 Configuración del ROUTER ENCORE-PARAISO
Agregamos las direcciones IPS en el ether 2 para hacer la conexion con el ROUTER BORDE Y ether 3 para nuestras Lan que tendras nuestra ONU ,Se configurara un servidor PPPoE Para la conexion con la ONU
Nota
Configuramos la ruta por defecto y comprobamos que tenga internet
Por comandos
/ipv6 address

add address=2400:beef:2001:eeee:1::2 advertise=no comment=PTP-RB-BORDE \

    interface=ether2
Por Interfaz
PASO 4.1 Configuración del PPPoE En RB-ENCORE-PARAISO
Configuracion del POOL
Crea un pool de direcciones IPv6 para asignar bloques /64 al tunel PPPoE y /56.para que la ONU pueda repartir a los clientes finales
Por comandos
/ipv6 pool

add name=pool_prefix_pool prefix=2400:beef:6020::/44 prefix-length=64

add name=pool_dhcp_pd prefix=2400:beef:6010::/44 prefix-length=56
Por interfaz

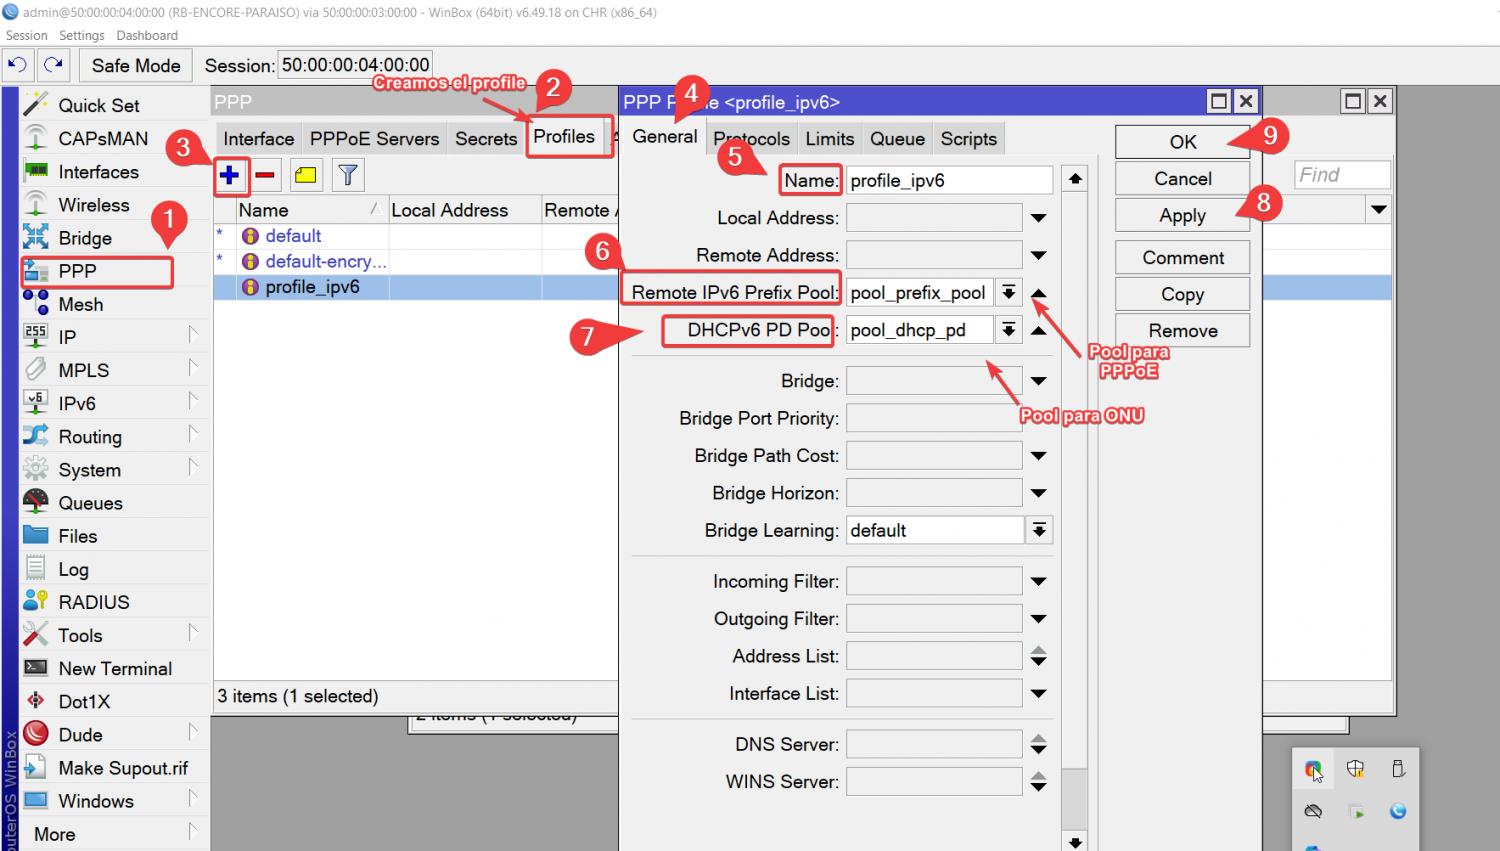
Configuracion del Profile
Crea un perfil PPPoE que Permita solo una sesión por usuario y Asigne prefijos IPv6 dinámicamente desde el pool
Por comandos
/ppp profile

add dhcpv6-pd-pool=pool_dhcp_pd name=profile_ipv6 remote-ipv6-prefix-pool=\

    pool_prefix_pool
Por interfaz
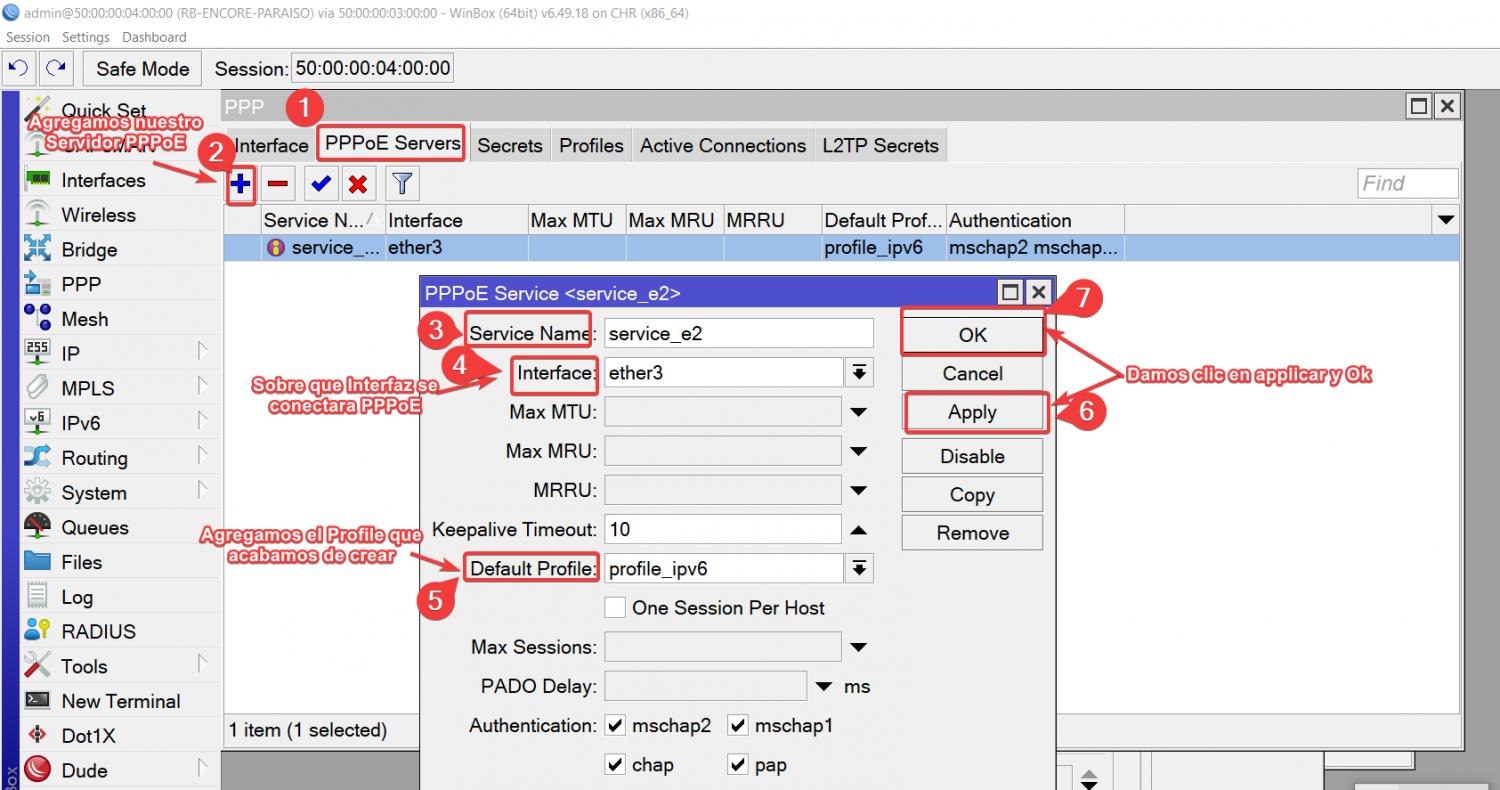
Configuracion del server PPPoEHabilita un servidor PPPoE sobre el Ethernet 3 y service-name:service.e2 es el nombre del servicio.De igual manera agregamos el perfil que creamos
Por comando
/interface pppoe-server server

add default-profile=profile_ipv6 disabled=no interface=ether3 service-name=\

    service_e2
Por interfaz
Agregamos el Secret
En ete paso agregamos las credenciales que tendra la ONU para conectarse Por PPPoE
PASO 5 Configuración del ROUTER ENCORE-MILAGRO
Agregamos las direcciones IPS en el ether 3 para hacer la conexion con el ROUTER BORDE Y ether 4 para nuestras Lan que tendras nuestra ONU ,Se configurara un servidor PPPoE Para la conexion con la ONU-2
Nota
Configuramos la ruta por defecto y comprobamos que tenga internet
Por comandos
/ipv6 address

add address=2400:beef:2001:ffff:2::2 interface=ether3
Por interfaz

PASO 4.1 Configuración del PPPoE En RB-ENCORE-PARAISO
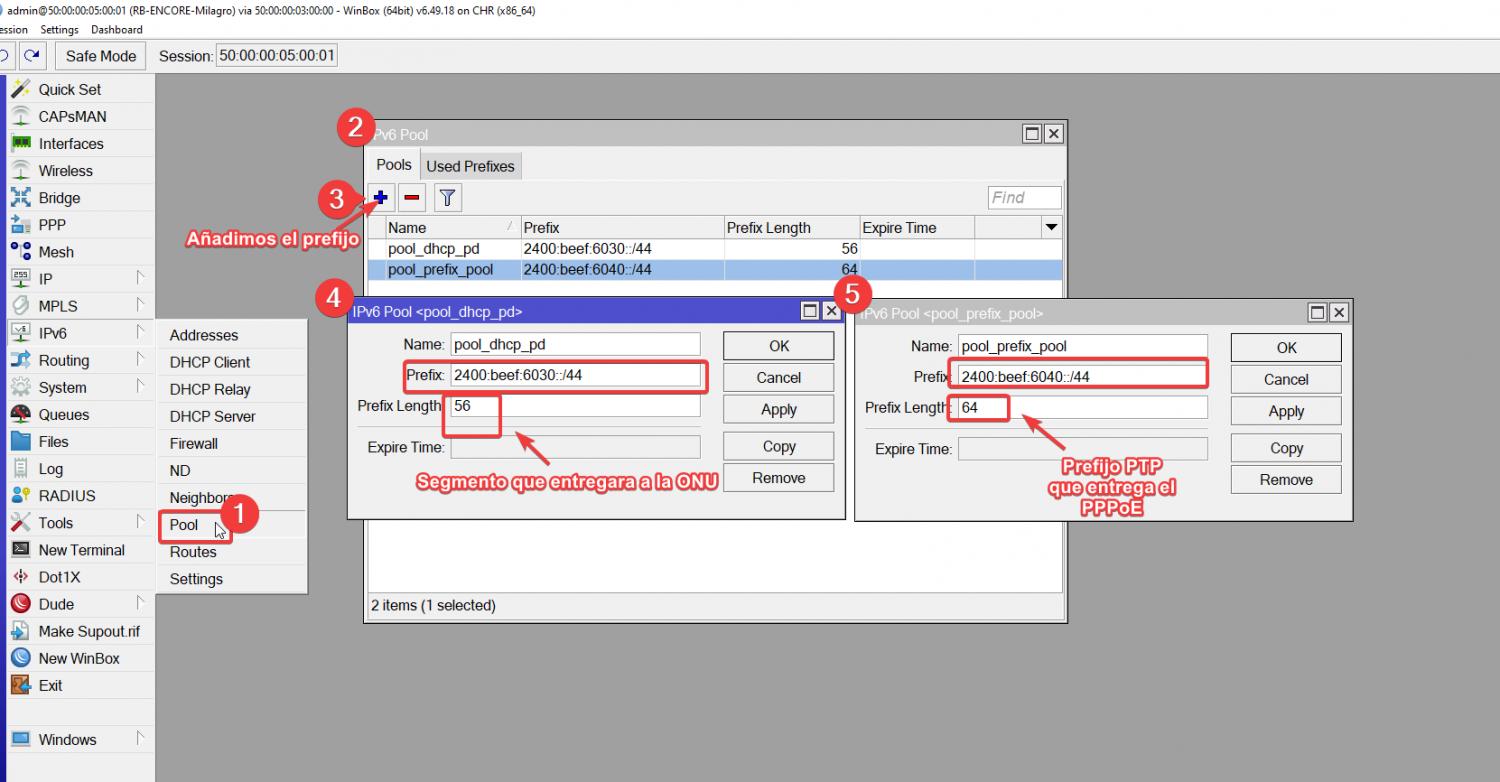
Configuracion del POOL
Crea un pool de direcciones IPv6 para asignar bloques /64 al tunel PPPoE y /56.para que la ONU pueda repartir a los clientes finales
Por comandos
/ipv6 pool

add name=pool_dhcp_pd prefix=2400:beef:6030::/44 prefix-length=56

add name=pool_prefix_pool prefix=2400:beef:6040::/44 prefix-length=64
Por interfaz
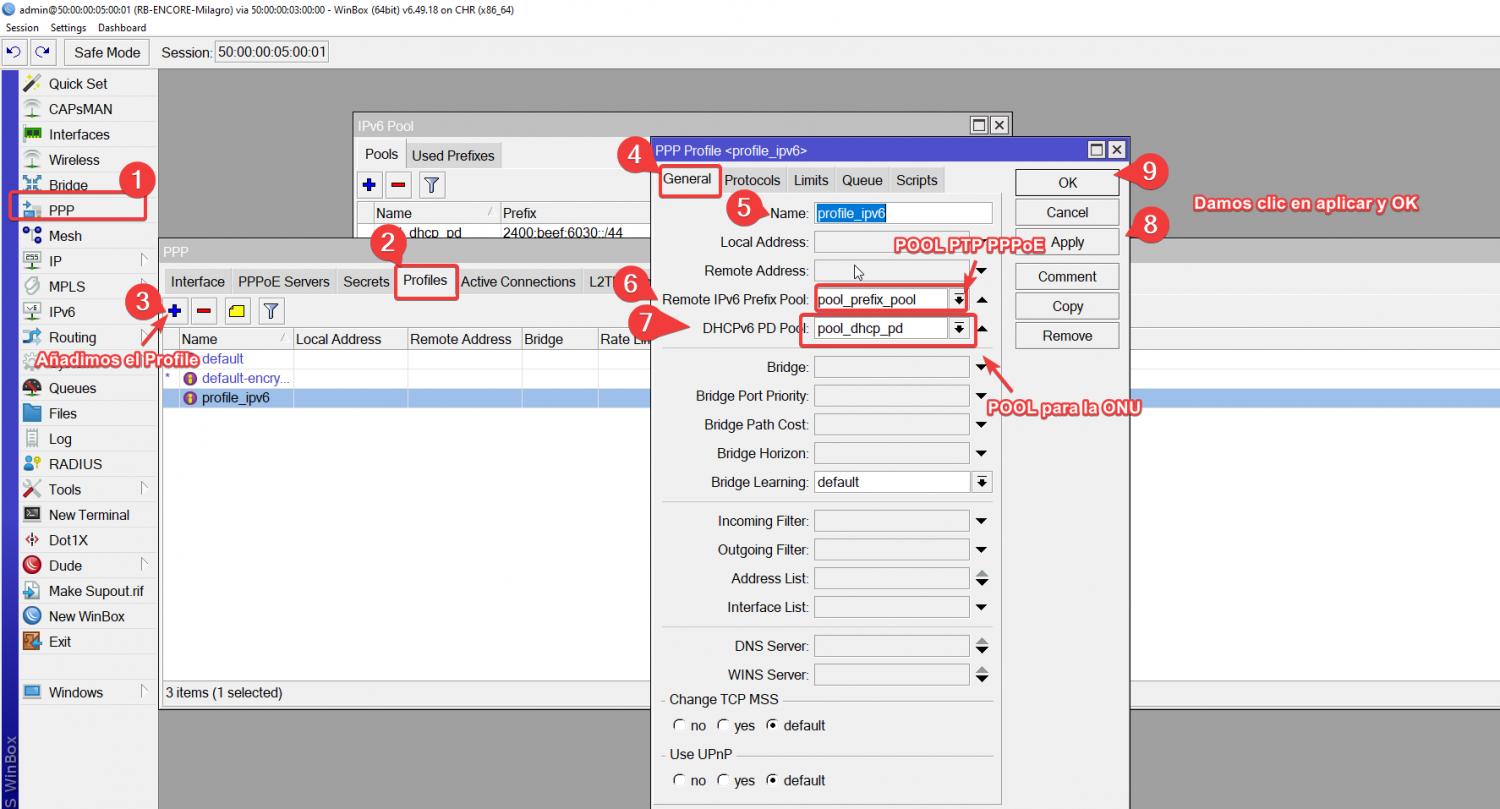
Configuracion del Profile
Crea un perfil PPPoE que Permita solo una sesión por usuario y Asigne prefijos IPv6 dinámicamente desde el pool
Por comandos
/ppp profile

add dhcpv6-pd-pool=pool_dhcp_pd name=profile_ipv6 remote-ipv6-prefix-pool=\

    pool_prefix_pool
Por interfaz
Configuracion del server PPPoEHabilita un servidor PPPoE sobre el Ethernet 3 y service-name:service.e2 es el nombre del servicio.De igual manera agregamos el perfil que creamos
Por comandos
/interface pppoe-server server

add default-profile=profile_ipv6 disabled=no interface=ether4 service-name=\

    service1
Por interfaz

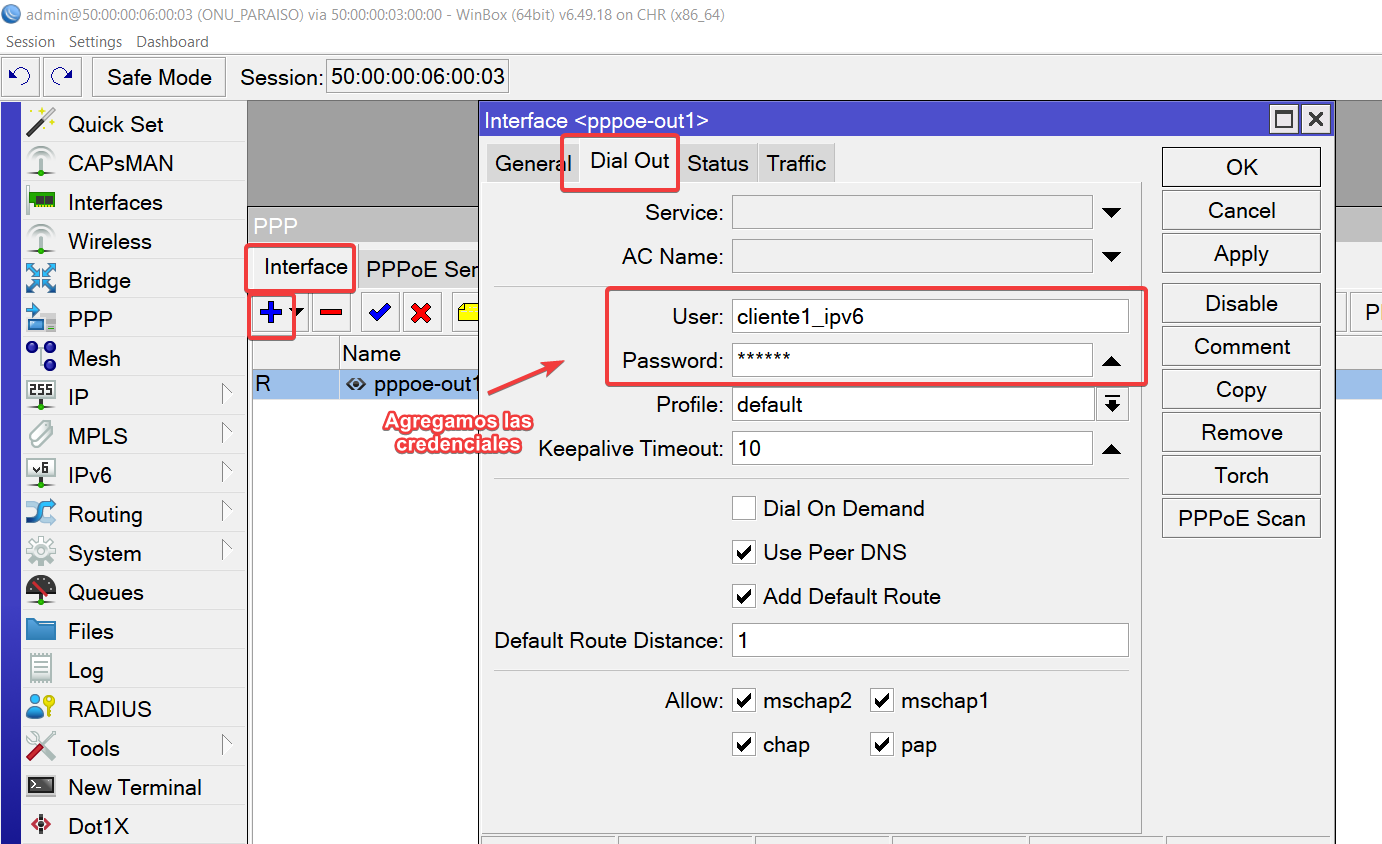
PASO6 Configuración de la ONU 1
En este caso la conexion es PPPoE,agregamos una conexion tipo PPPoE client,sobre la interfaz ether 3
Por comandos
/interface pppoe-client

add add-default-route=yes disabled=no interface=ether3 name=pppoe-out1 \

    password=123456 use-peer-dns=yes user=cliente1_ipv6

Configuramos el usuario y contraseña Y Habilitamos el Use Peer DNS usa el servidor DNS que ofrece el proveedor Y Add default route:añade una ruta por defecto (default route) automáticamente cuando se levanta la conexión.
Agregamos el DHCP CLIENT
En este paso vamos a adquir el prefijo del Pool que previamente habiamos configurado en RB-ENCORE-PARAISO
Por comandos
/ipv6 dhcp-client

add add-default-route=yes interface=pppoe-out1 pool-name=LAN request=prefix
Por interfaz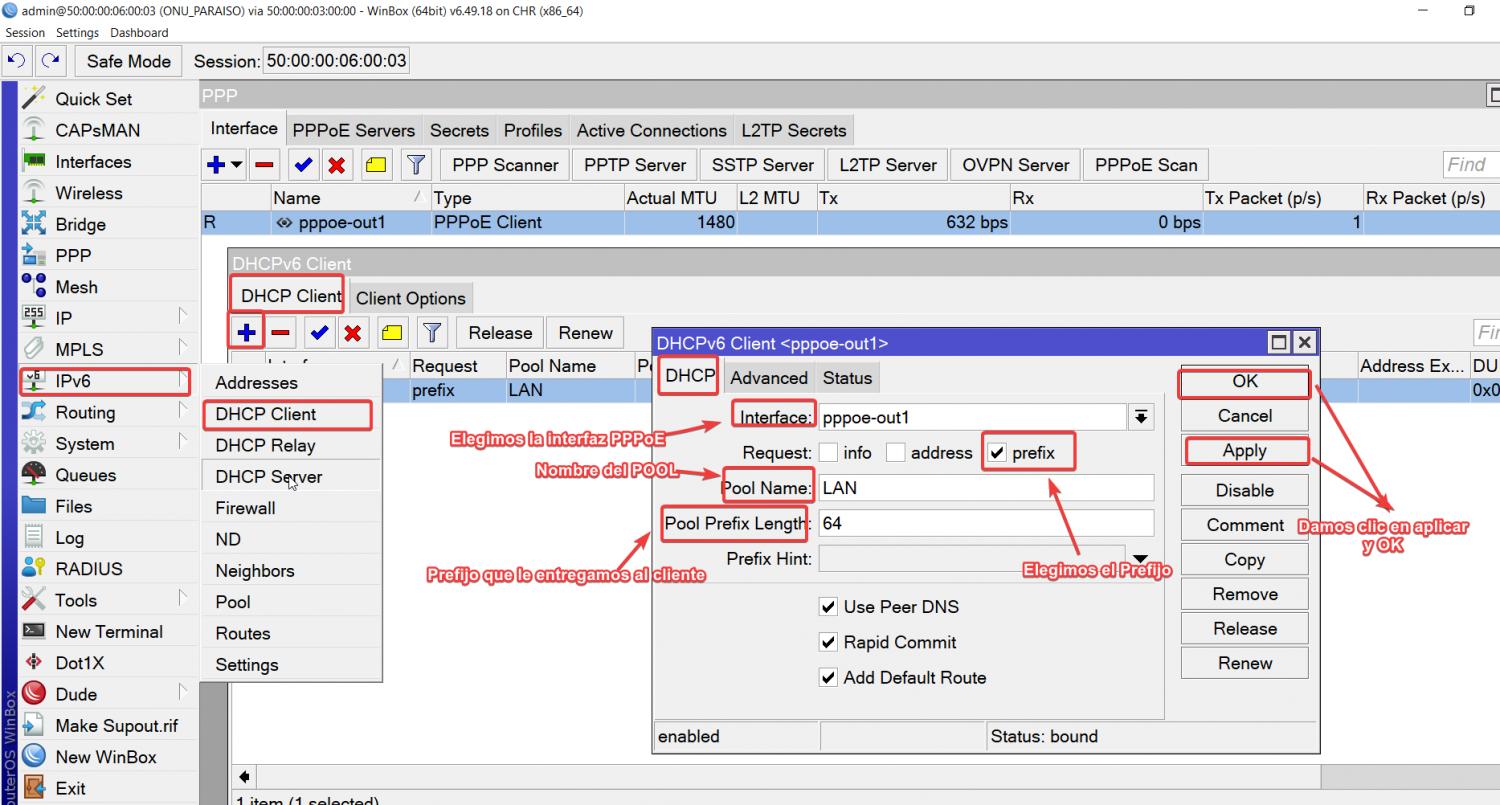
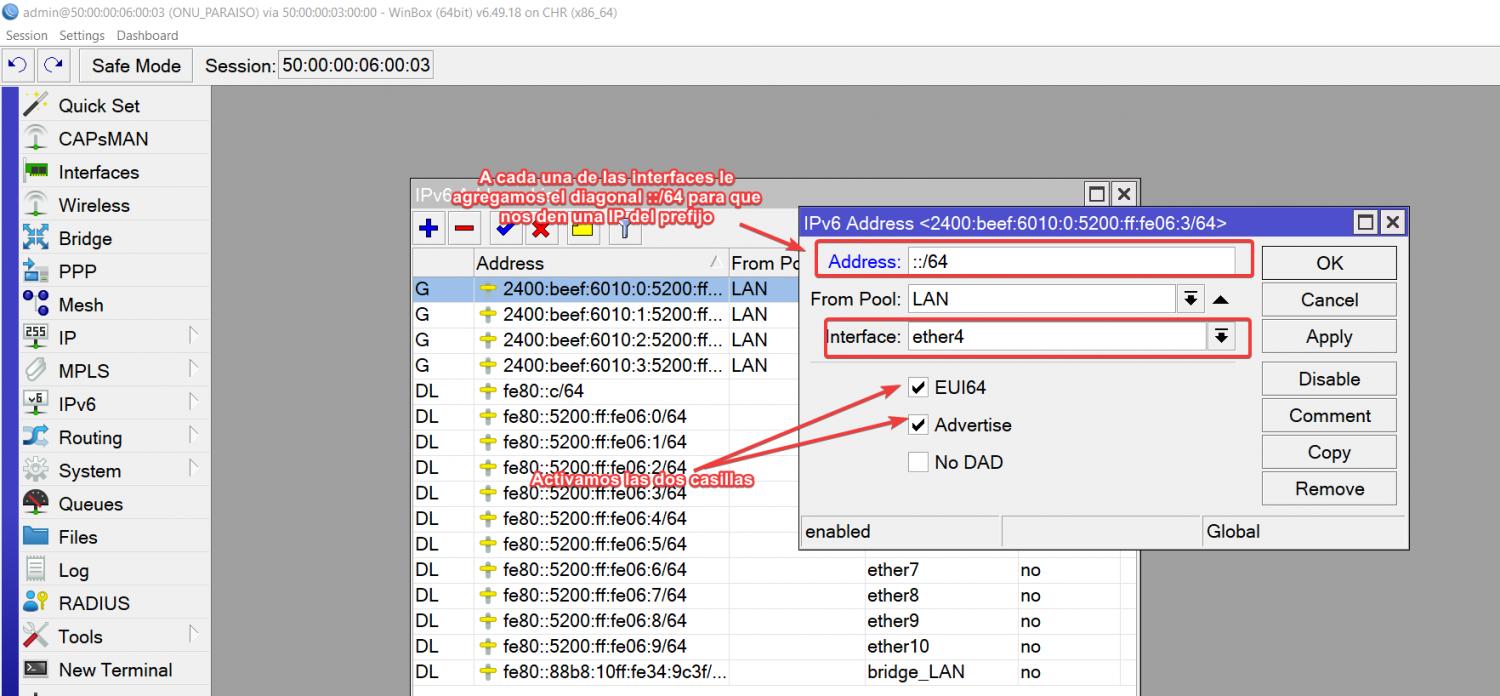
Agregamos la direcciones PV6 Con la ayuda de EUI64,es una técnica que se usa en IPv6 para crear automáticamente una dirección IP basada en la MAC Address
Por comandos
/ipv6 address

add address=::5200:ff:fe06:0 eui-64=yes from-pool=LAN interface=ether1

add address=::5200:ff:fe06:1 eui-64=yes from-pool=LAN interface=ether2

add address=::5200:ff:fe06:2 eui-64=yes from-pool=LAN interface=ether3

add address=::5200:ff:fe06:3 eui-64=yes from-pool=LAN interface=ether4
Por interfaz
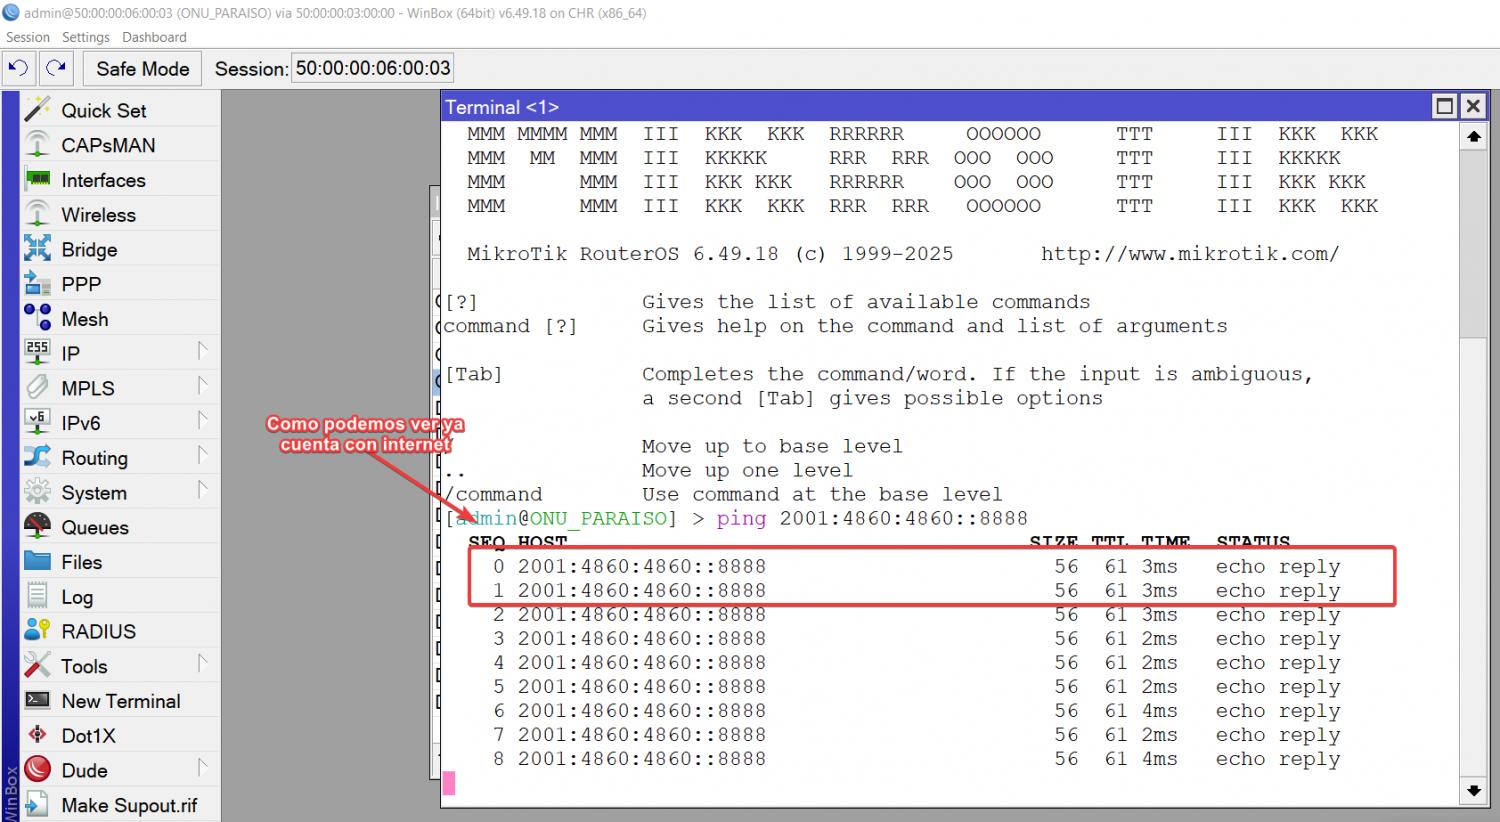
Nota
Una vez que tengamos configuradas las IPV6 , Comprobamos que tengamos internet
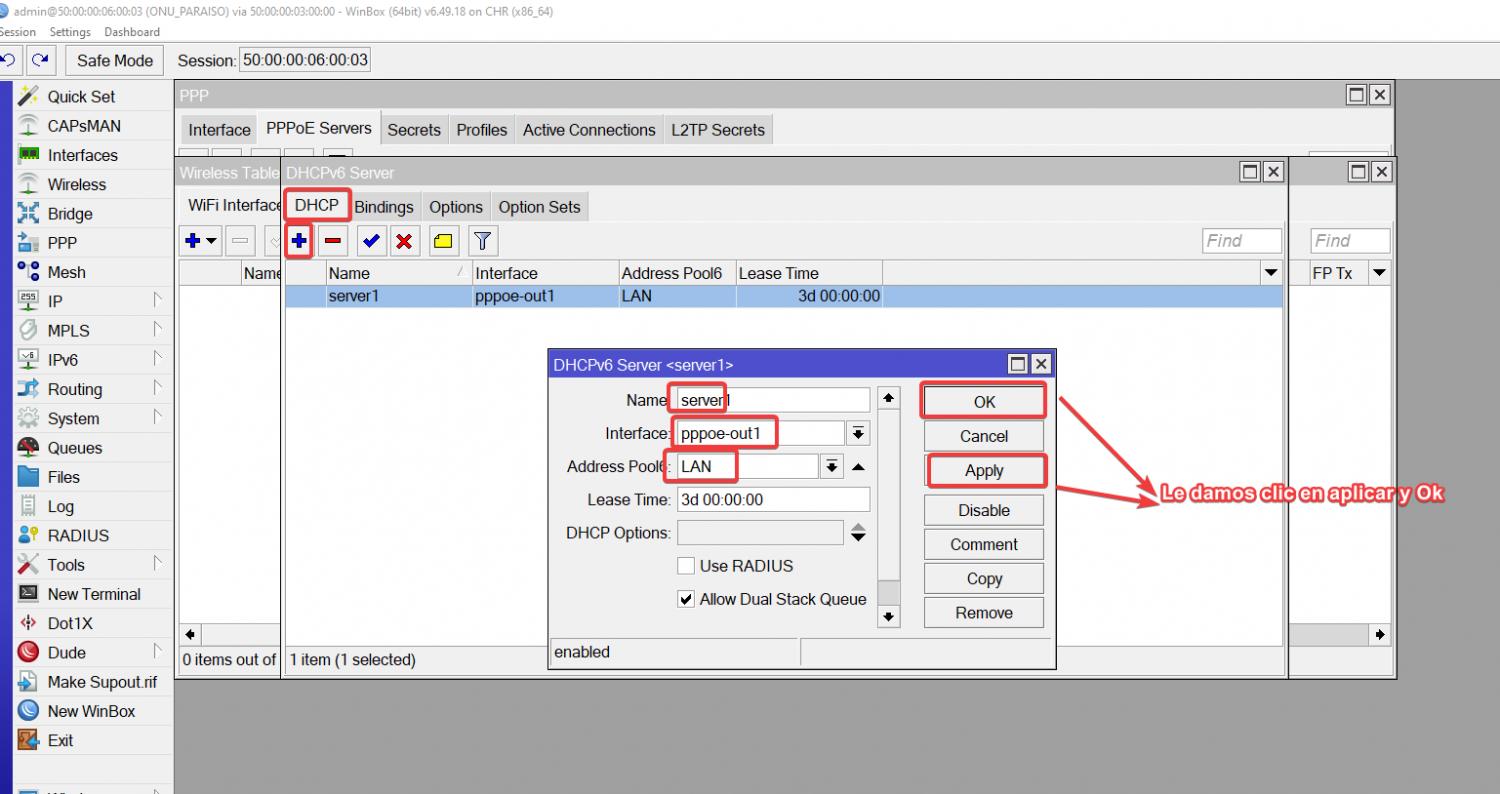
 Creacion de un servidor DHCP en IPV6
Este servidor nos ayudara a que los clientes puedan tener una Ip del prefijo asignado
Por comandos
/ipv6 dhcp-client

add add-default-route=yes interface=pppoe-out1 pool-name=LAN request=prefix
Por interfaz
Habilitamos el ND En la ONU
Neighbor Discovery Sirve para que los dispositivos se encuentren y se comuniquen entre ellos en una red local.
Por comandos
/ipv6 nd

set [ find default=yes ] other-configuration=yes
Por interfaz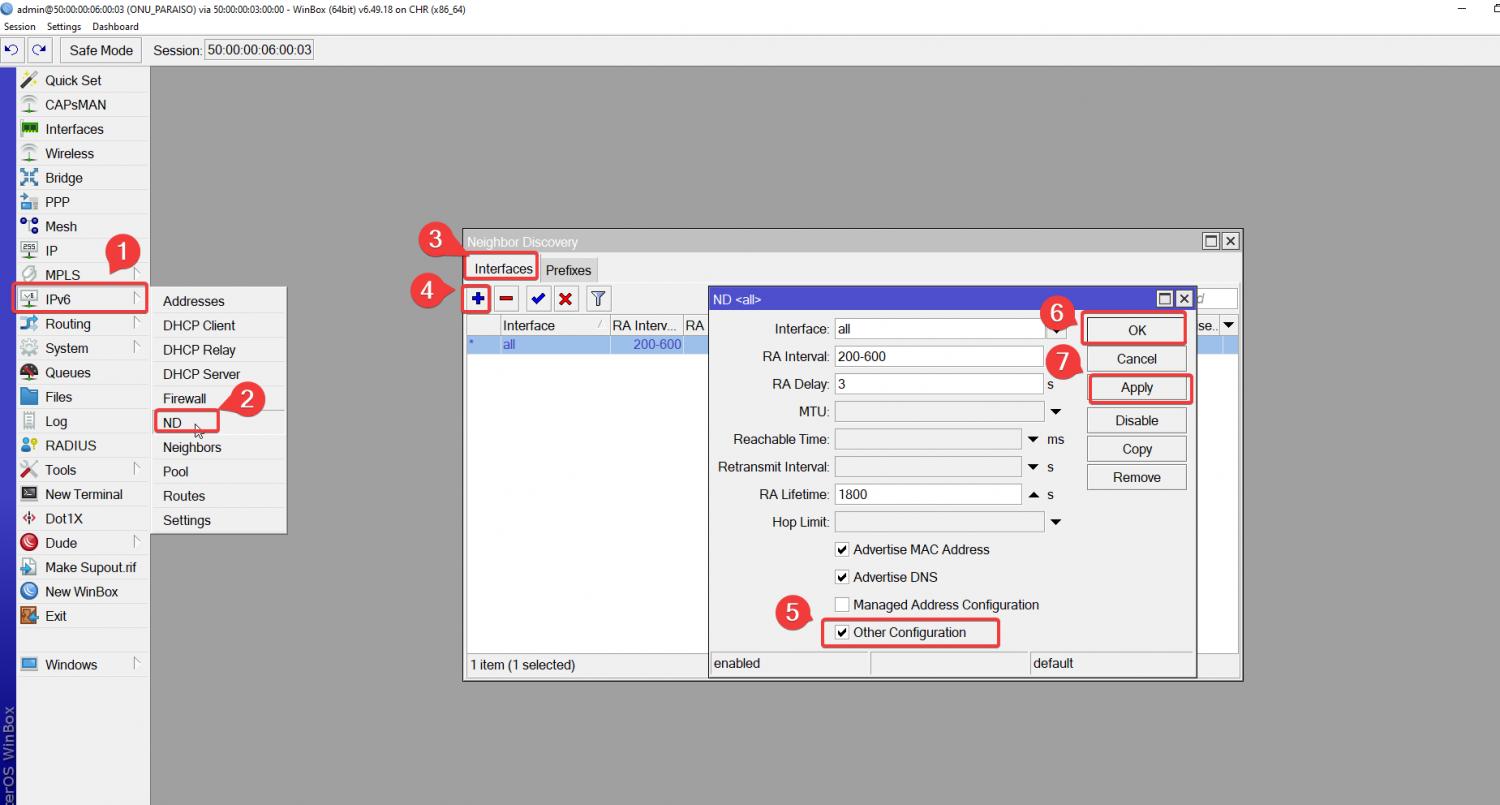
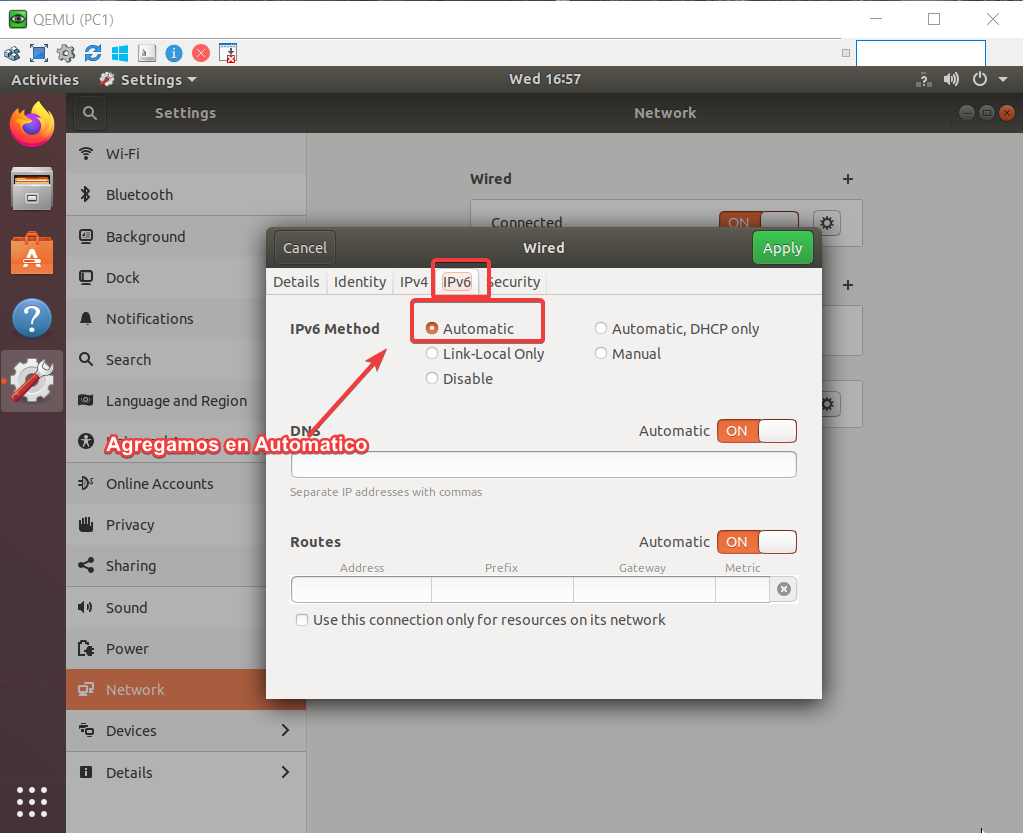
Paso 5.1 Configuramos el PC-1
Entramos a la configuracion de red de la pc y elegimos la opcion DHCP
Nota
Observamos la IP que nos otorga la ONU
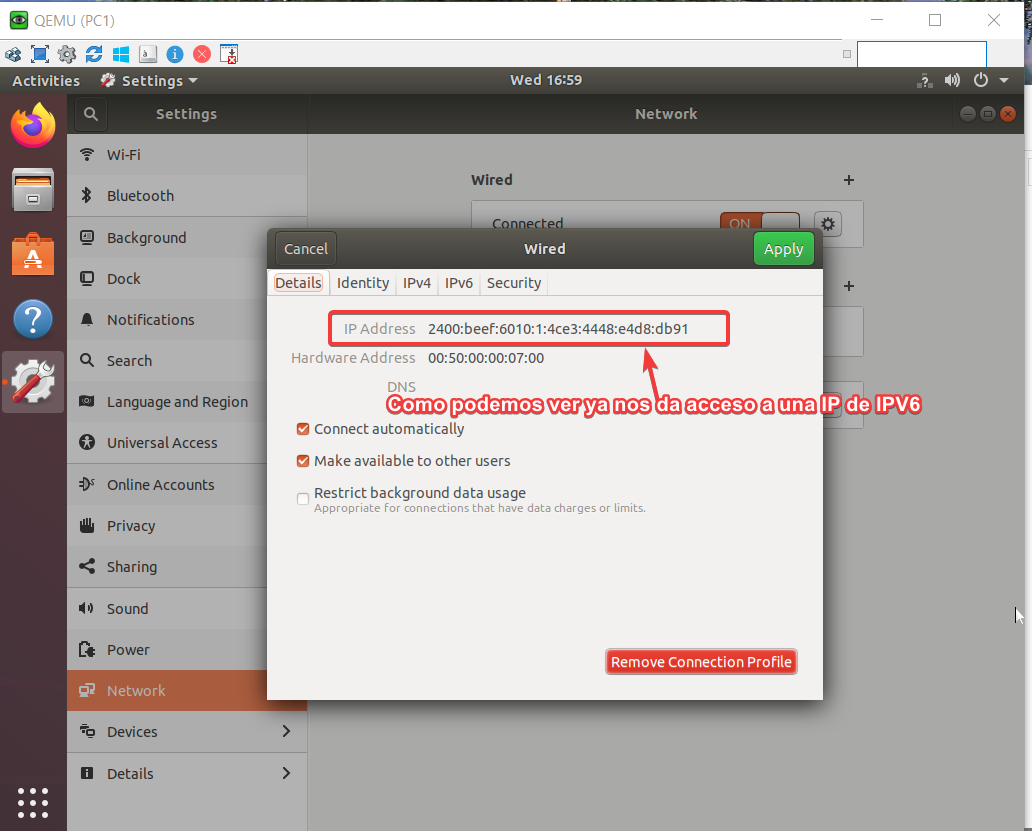 Comprobamos el PING Y Listo
SCRIPTS
Router Google
/interface bridge

add name=looback

/interface wireless security-profiles

set [ find default=yes ] supplicant-identity=MikroTik

/routing bgp instance

set default as=800 router-id=2.2.2.2

/ip address

add address=2.2.2.2 interface=looback network=2.2.2.2

/ip dhcp-client

add disabled=no interface=ether1

/ipv6 address

add address=2001:4860:4860::8887 comment="PTP GOOGLE" interface=ether2

add address=2001:4860:abab::1 comment=PTP-BORDE-PRINCIPAL interface=ether4

/routing bgp network

add network=2001:4860:4000::/36 synchronize=no

add network=2001:4860:abab::/64 synchronize=no

/routing bgp peer

add address-families=ipv6 name=peer-to-borde remote-address=2001:4860:abab::2 \

    remote-as=100 update-source=ether4

/system identity

set name=RB-GOOGLE

/tool romon

set enabled=yes
ROUTER BORDE PRINCIPAL
/interface bridge

add name=Looback

/interface wireless security-profiles

set [ find default=yes ] supplicant-identity=MikroTik

/routing bgp instance

set default as=100 router-id=1.1.1.1

/ip address

add address=1.1.1.1 interface=Looback network=1.1.1.1

/ip dhcp-client

add disabled=no interface=ether1

/ipv6 address

add address=2001:4860:abab::2 comment="PTP-RB GOOGLE" interface=ether4

add address=2400:beef:2001:ffff:2::1 comment="PTP-RB ENCORE-MILAGRO" \

    interface=ether3

add address=2400:beef:2001:eeee:1::1 comment=PTP-RB-ENCORE-PARAISO interface=\

    ether2

/ipv6 route

add distance=1 dst-address=2400:beef:6010::/44 gateway=\

    2400:beef:2001:eeee:1::2

add distance=1 dst-address=2400:beef:6030::/44 gateway=\

    2400:beef:2001:ffff:2::2

/routing bgp network

add network=2400:beef::/32 synchronize=no

/routing bgp peer

add address-families=ipv6 name=peer-to-google remote-address=\

    2001:4860:abab::1 remote-as=800

/system identity

set name=RB-BORDE

/tool romon

set enabled=yes
ROUTER ENCORE-PARAISO
/interface wireless security-profiles

set [ find default=yes ] supplicant-identity=MikroTik

/ipv6 pool

add name=pool_prefix_pool prefix=2400:beef:6020::/44 prefix-length=64

add name=pool_dhcp_pd prefix=2400:beef:6010::/44 prefix-length=56

/ppp profile

add dhcpv6-pd-pool=pool_dhcp_pd name=profile_ipv6 remote-ipv6-prefix-pool=\

    pool_prefix_pool

/interface pppoe-server server

add default-profile=profile_ipv6 disabled=no interface=ether3 service-name=\

    service_e2

/ip dhcp-client

add disabled=no interface=ether1

/ip dns

set servers=2001:4860:4860::8888,2001:4860:4860::8844

/ipv6 address

add address=2400:beef:2001:eeee:1::2 advertise=no comment=PTP-RB-BORDE \

    interface=ether2

/ipv6 nd

set [ find default=yes ] other-configuration=yes

/ipv6 route

add distance=1 gateway=2400:beef:2001:eeee:1::1

/ppp secret

add name=cliente1_ipv6 password=123456 service=pppoe

add name=cliente_2_ipv6 password=1234 service=pppoe

/system identity

set name=RB-ENCORE-PARAISO

/tool romon

set enabled=yes
ENCORE-MILAGRO
/interface wireless security-profiles

set [ find default=yes ] supplicant-identity=MikroTik

/ipv6 pool

add name=pool_dhcp_pd prefix=2400:beef:6030::/44 prefix-length=56

add name=pool_prefix_pool prefix=2400:beef:6040::/44 prefix-length=64

/ppp profile

add dhcpv6-pd-pool=pool_dhcp_pd name=profile_ipv6 remote-ipv6-prefix-pool=\

    pool_prefix_pool

/interface pppoe-server server

add default-profile=profile_ipv6 disabled=no interface=ether4 service-name=\

    service1

/ip dhcp-client

add disabled=no interface=ether1

/ipv6 address

add address=2400:beef:2001:ffff:2::2 interface=ether3

/ipv6 nd

set [ find default=yes ] other-configuration=yes

/ipv6 route

add distance=1 gateway=2400:beef:2001:ffff:2::1

/ppp secret

add name=Cliente1_ipv6 password=12345 service=pppoe

/system identity

set name=RB-ENCORE-Milagro

/tool romon

set enabled=yes
ONU
/interface pppoe-client

add add-default-route=yes disabled=no interface=ether3 name=pppoe-out1 \

    password=123456 use-peer-dns=yes user=cliente1_ipv6

/interface wireless security-profiles

set [ find default=yes ] supplicant-identity=MikroTik

/ipv6 dhcp-server

add address-pool=LAN interface=bridge_LAN name=server1

/ip dhcp-client

add disabled=no interface=ether3

/ipv6 address

add address=::5200:ff:fe06:0 eui-64=yes from-pool=LAN interface=ether1

add address=::5200:ff:fe06:1 eui-64=yes from-pool=LAN interface=ether2

add address=::5200:ff:fe06:2 eui-64=yes from-pool=LAN interface=ether3

add address=::5200:ff:fe06:3 eui-64=yes from-pool=LAN interface=ether4

/ipv6 dhcp-client

add add-default-route=yes interface=pppoe-out1 pool-name=LAN request=prefix

/ipv6 nd

set [ find default=yes ] other-configuration=yes

/system identity

set name=ONU_PARAISO

/tool romon

set enabled=yes
LABORATORIO
_Exports_unetlab_export-20250430-224148.zip

 Gracias:
  Me agrada:
  Me desagrada:


 Citar
Citar