 PASO 2Configuración del ROUTER GOOGLE
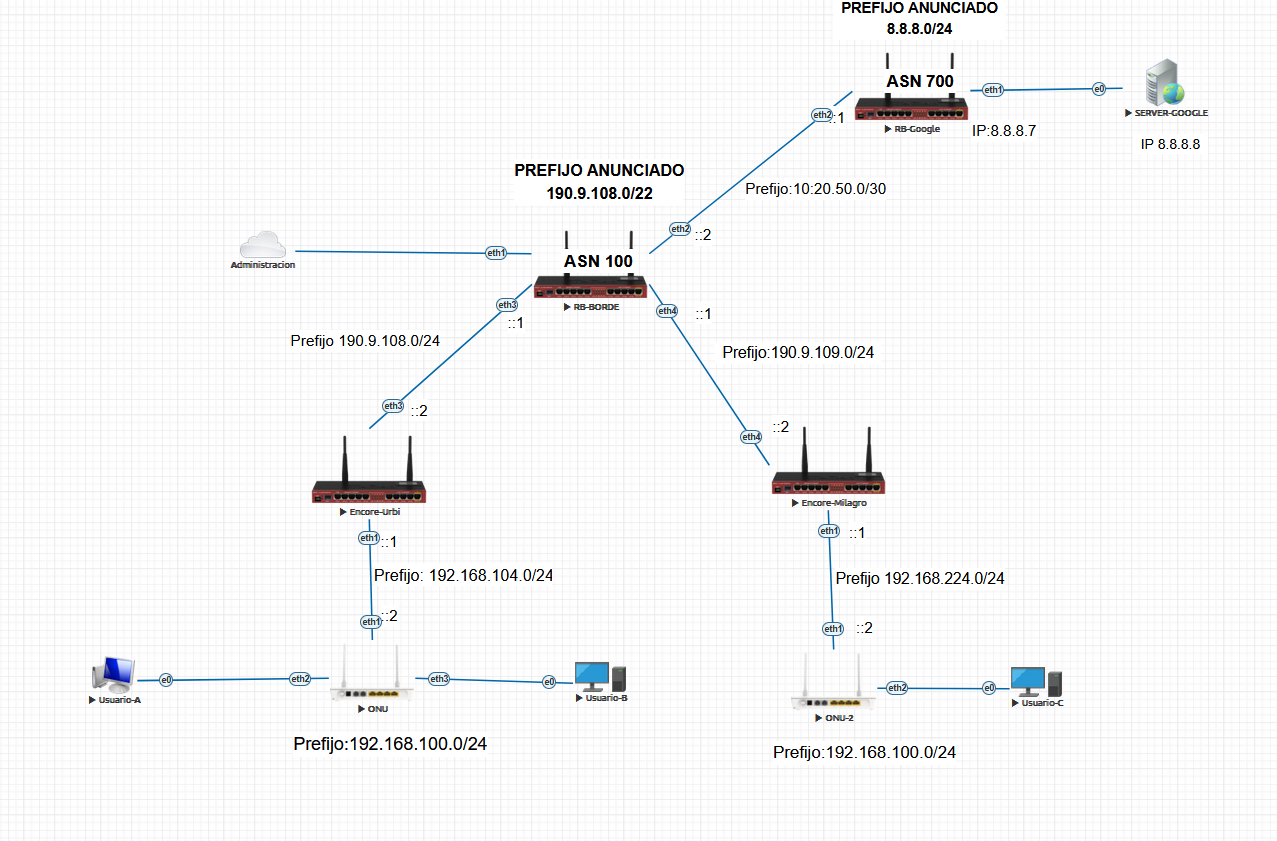
Configure las ips que irán en cada una de las interfaces Ethernet de cada router, de acuerdo a la topología
Nota
ADVERTENCIA
Se configura el ROUTER GOOGLE por fines de la practica, En la vida real es independiente de nosotros
Por Comandos
/ip address

add address=8.8.8.7/24 comment=PTP-GOOGLE interface=ether1 network=8.8.8.0

add address=10.20.50.1/30 comment=PTP-RB-BORDE interface=ether2 network=\

    10.20.50.0
Por interfaz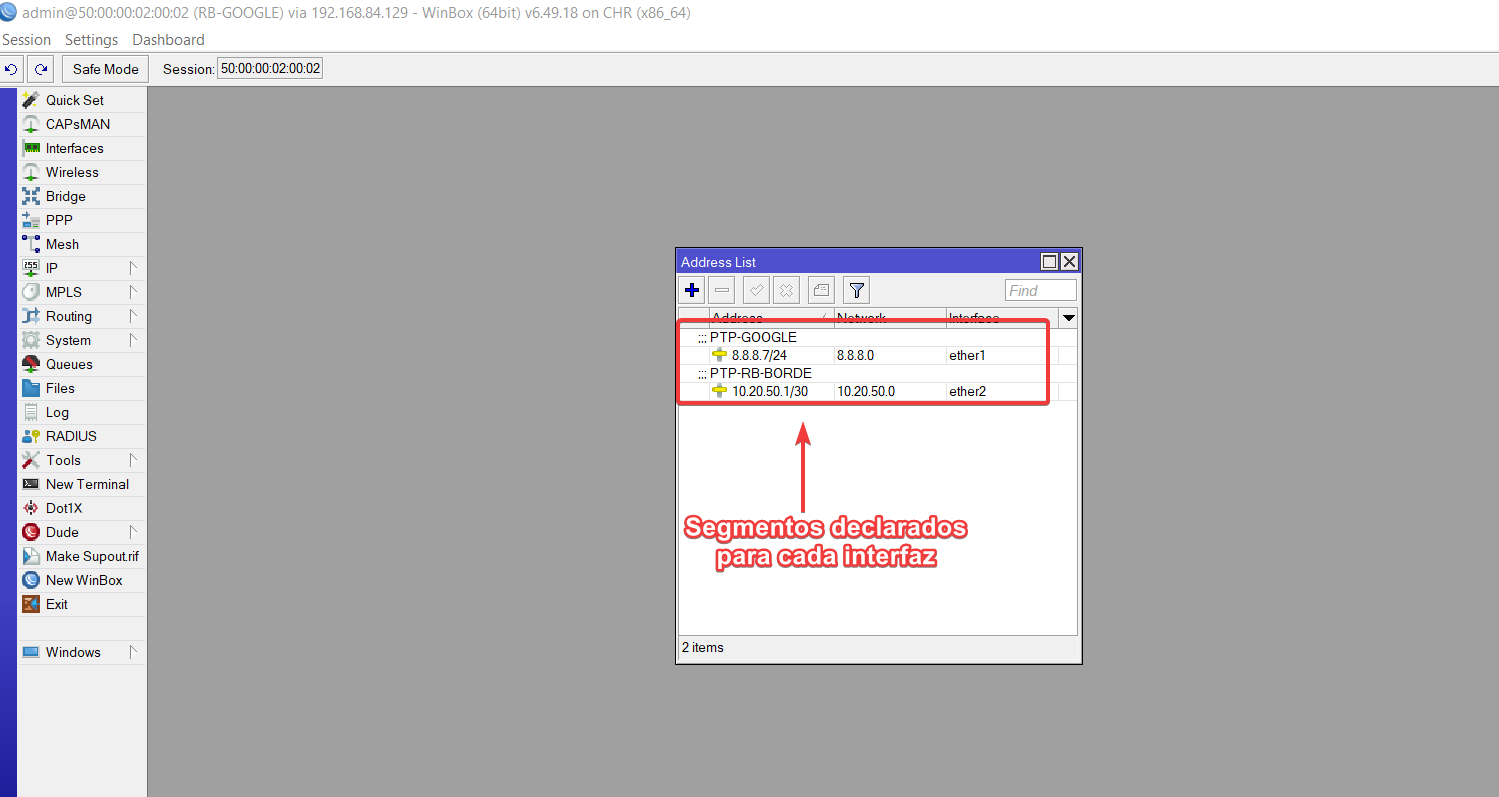 PASO2.1Configuración básica de BGP ROUTER GOOGLE
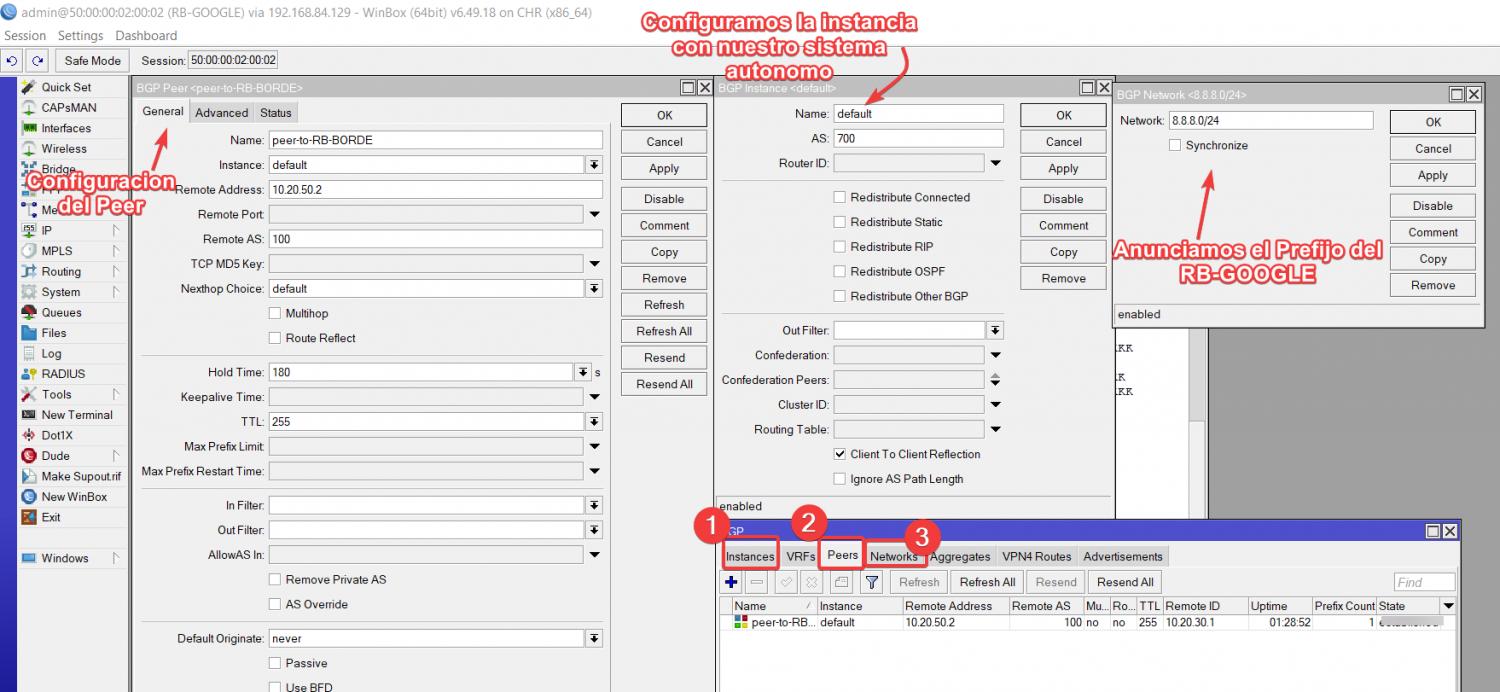
vamos a configurar la instancia, el peer y el network del RB
- Interfaz de red: 10.20.50.1/30
- AS: 700
- Vecino BGP: 10.20.50.2/30
- AS Vecino 100
Por comandos
/routing bgp instance

set default as=700

/routing bgp network

add network=8.8.8.0/24 synchronize=no

/routing bgp peer

add name=peer-to-RB-BORDE remote-address=10.20.50.2 remote-as=100
Por interfaz
Nota
Una vez que terminemos empezamos con la configuracion de nuestro RB vecino que es ROUTER BORDE
y configure el enmascaramiento
Por comando
/ip address

add address=10.20.50.2/30 comment="PTP RB-GOOGLE" interface=ether2 network=\

    10.20.50.0

add address=190.9.109.1/24 comment=PTP-ENCORE-MILAGRO interface=ether4 \

    network=190.9.109.0

add address=190.9.108.1/24 comment=PTP-ENCORE-URBI interface=ether3 network=\

    190.9.108.0=10.20.30.1/30 comment=PTP-ENCORE-URBI interface=ether3 network=\

    10.20.30.0
Por interfaz
 PASO
PASO[
3.1Configuración básica de BGP ROUTER BORDE
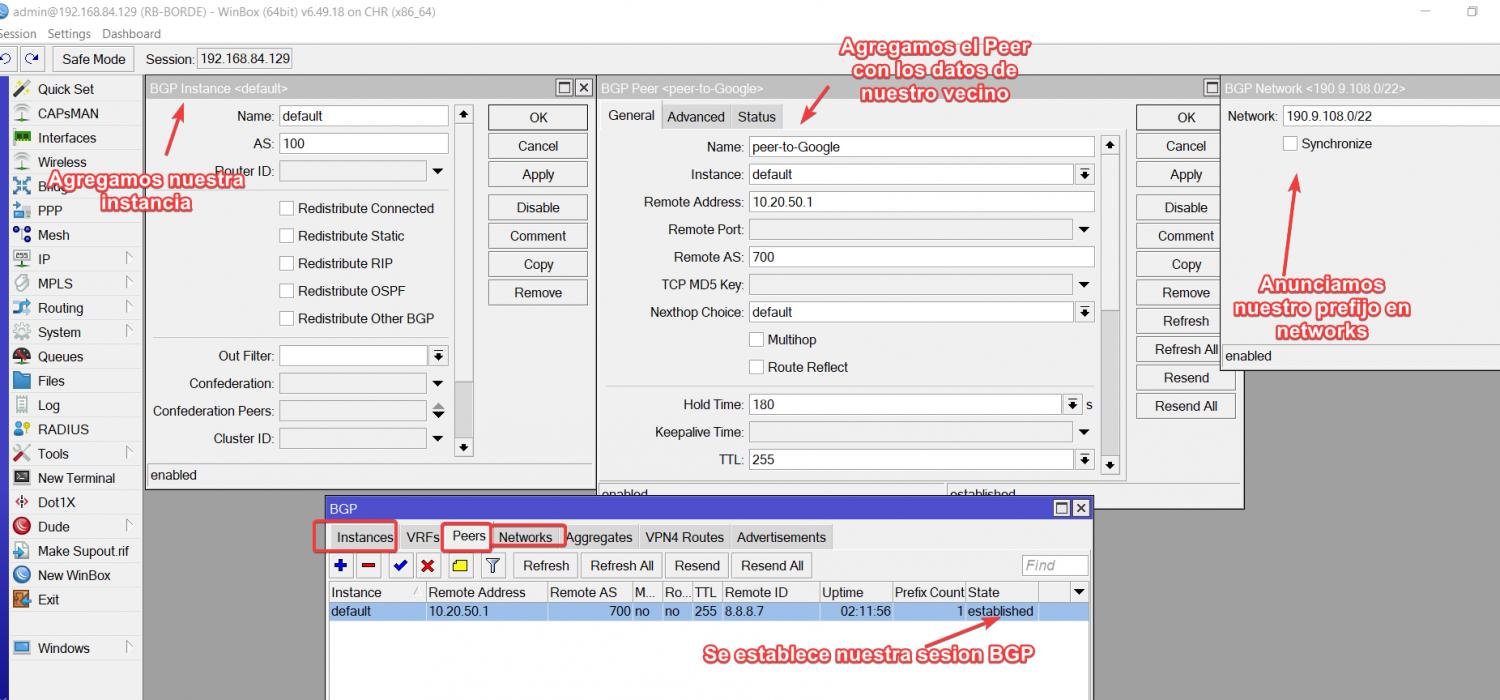
vamos a configurar la instancia, el peer y el network del RB
- Interfaz de red: 10.20.50.2/30
- AS: 100
- Vecino BGP: 10.20.50.1/30
- AS Vecino 700
Nota
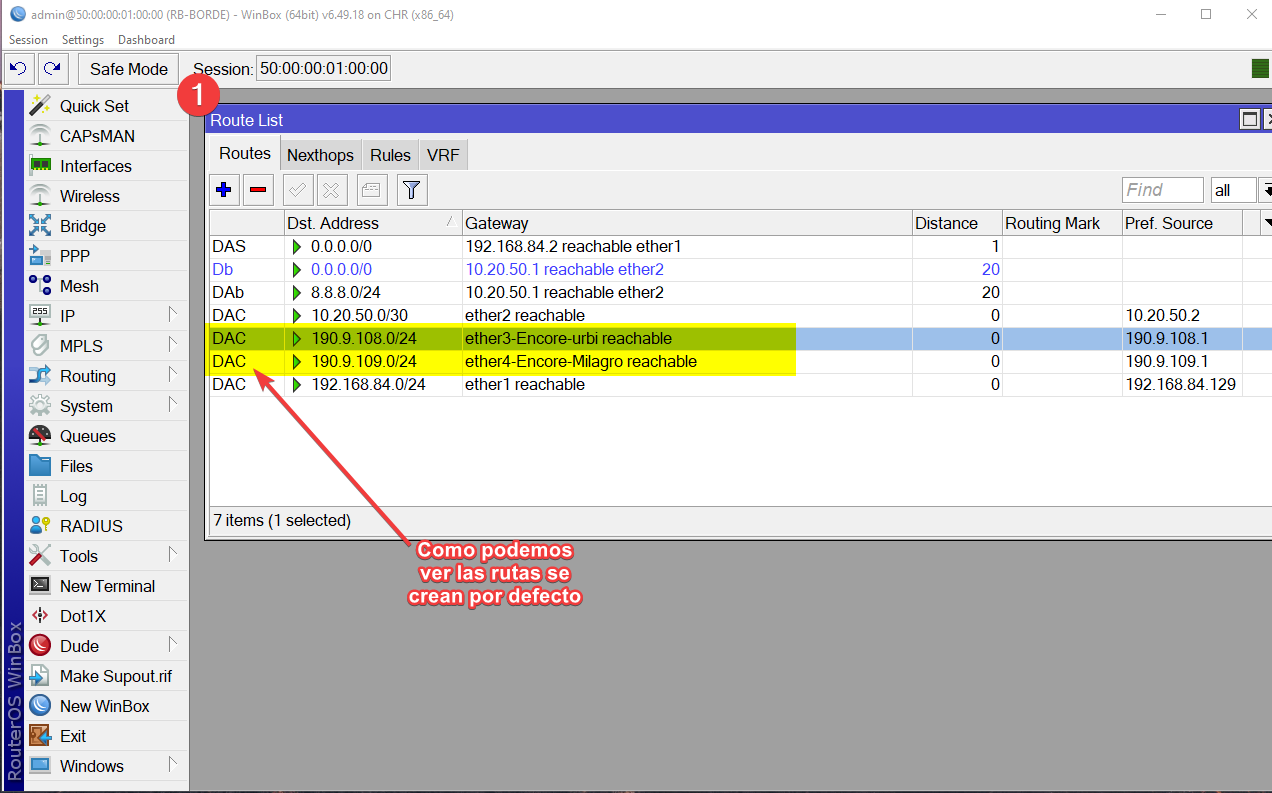
Se muestra una imagen de las rutas
En este caso no es nesesario agregar rutas estaticas a menos que bajes el prefijo para entregar a clientes residenciales o que tu PTP sea con IPs privadas
 PASO 4 Configuración del ROUTER ENCORE-MILAGRO
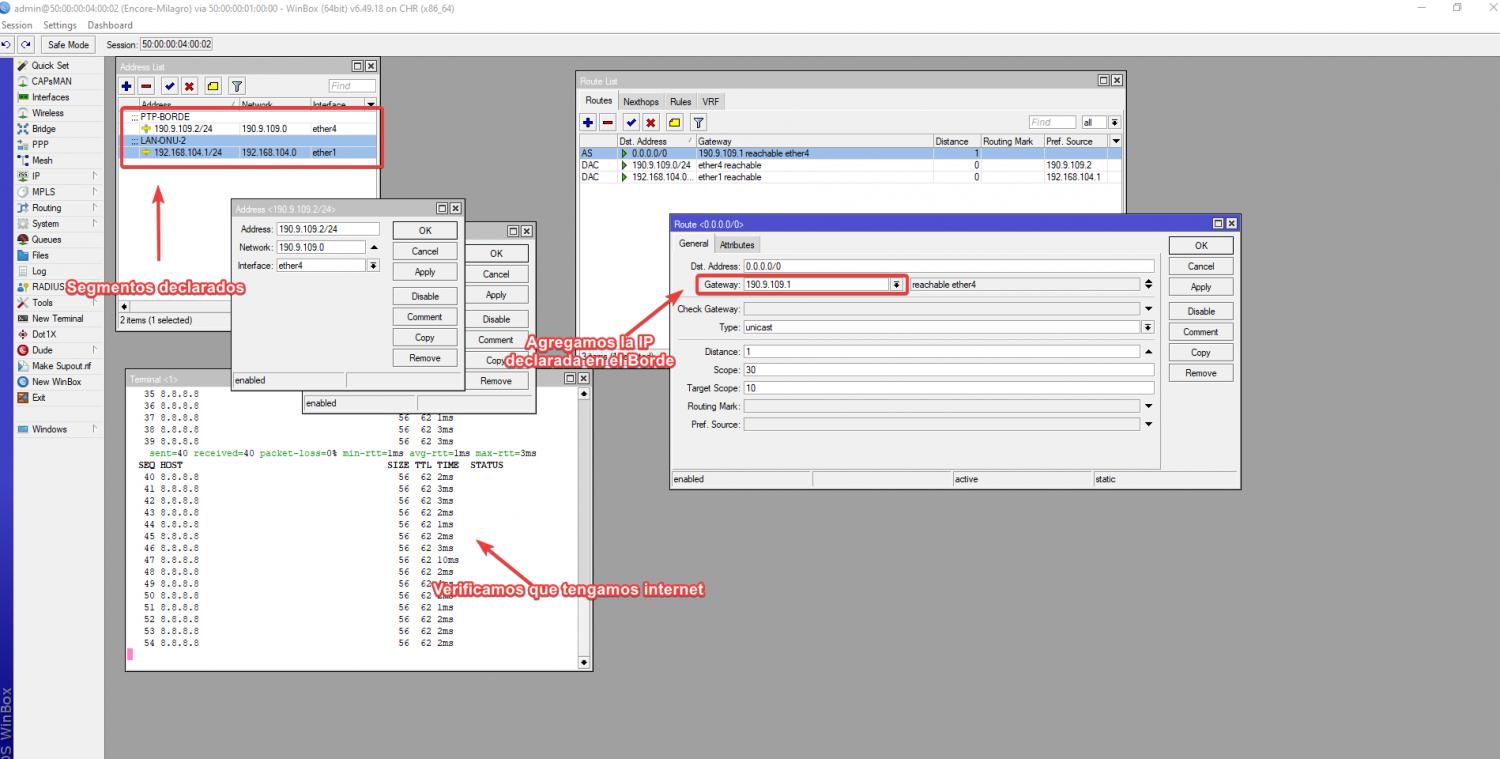
Agregamos las direcciones IPS,En mi caso utilizo una ip Privada PTP en el ether 4 para hacer la conexion con el ROUTER BORDE Y ether 1 para nuestras Lan que tendras nuestra ONU 2
Nota
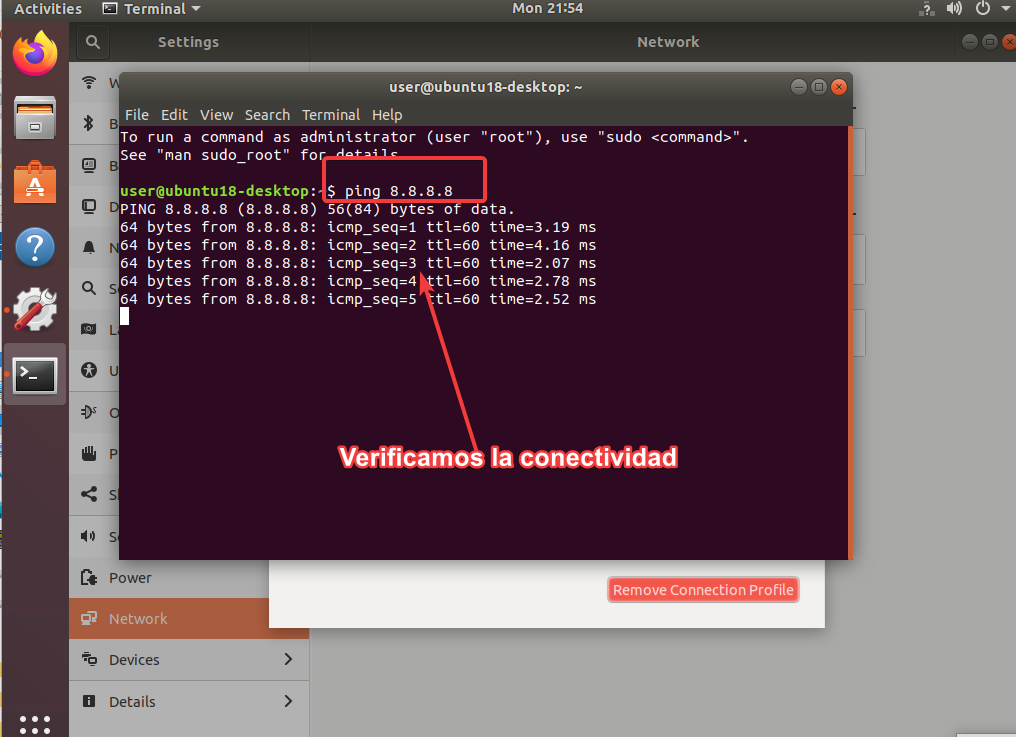
Configuramos la ruta por defecto y comprobamos que tenga internet
Por comandos
/ip address

add address=190.9.109.2/24 comment=PTP-BORDE interface=ether4 network=\

    190.9.109.0

add address=192.168.104.1/24 comment=LAN-ONU-2 interface=ether1 network=\

    192.168.104.0

 /ip route

add distance=1 gateway=190.9.109.1
Por interfaz
Nota
Configuramos el enmascaramiento sobre la interfaz ether 3
Entramos en el apartado IP/FIREWALL/NAT
Por comandos
/ip firewall nat
add action=masquerade chain=srcnat out-interface=ether4
Por interfaz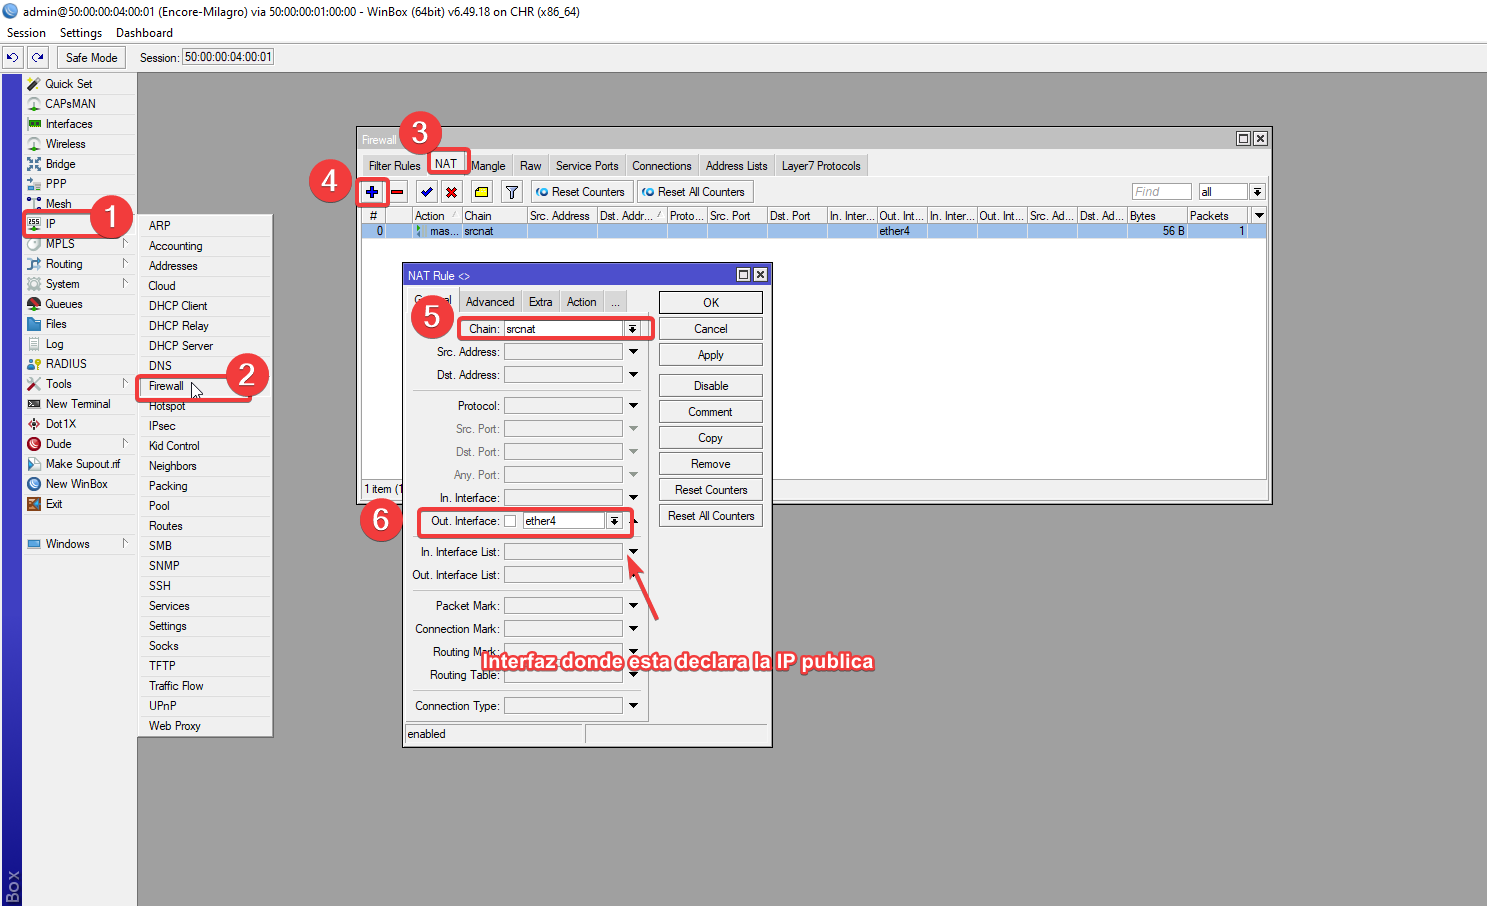
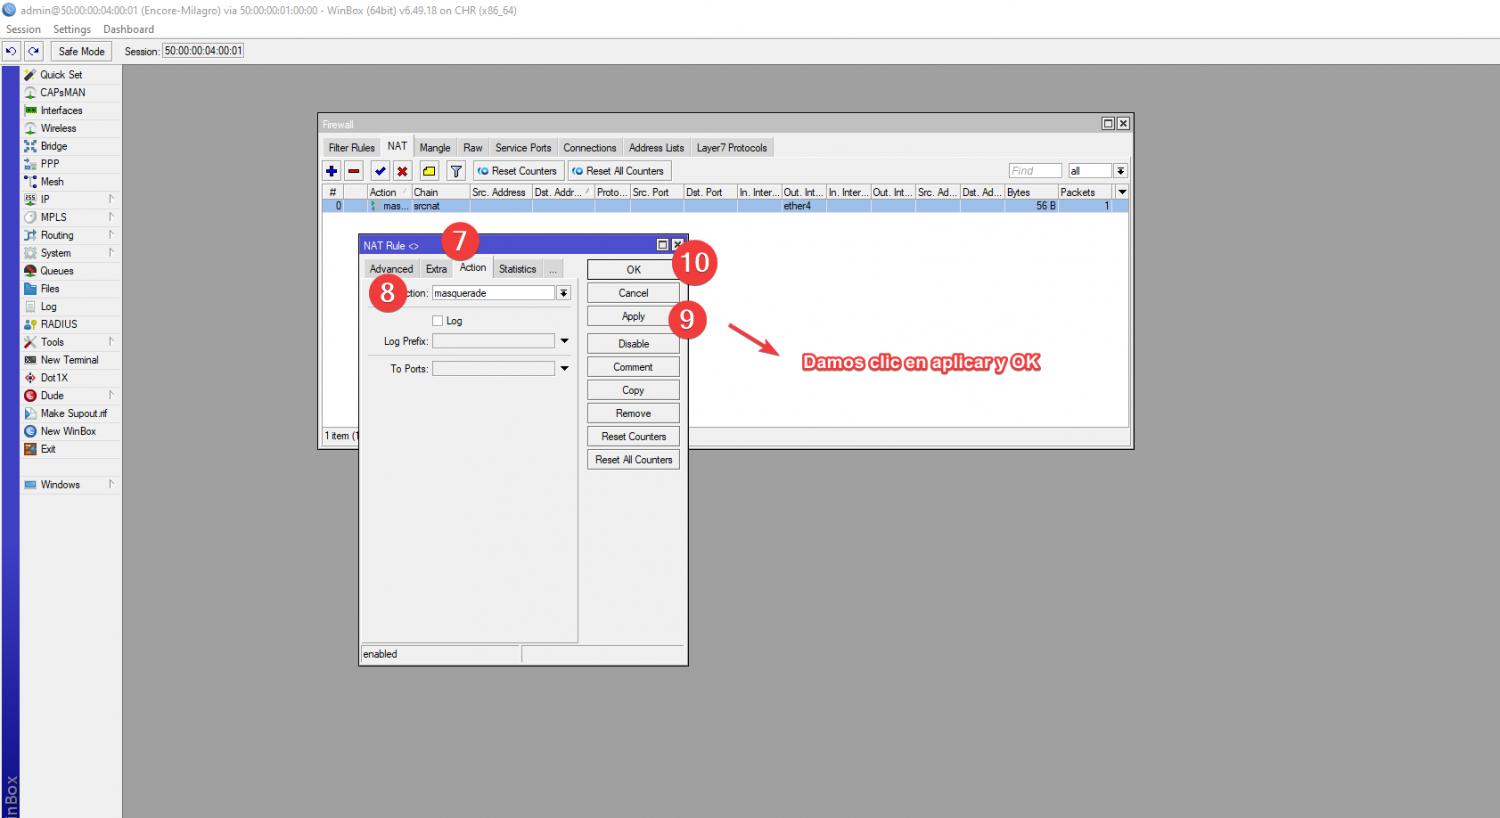
Elegimos en accion enmascaramiento
 PASO 4.1 Configuración del ROUTER ENCORE-URBI
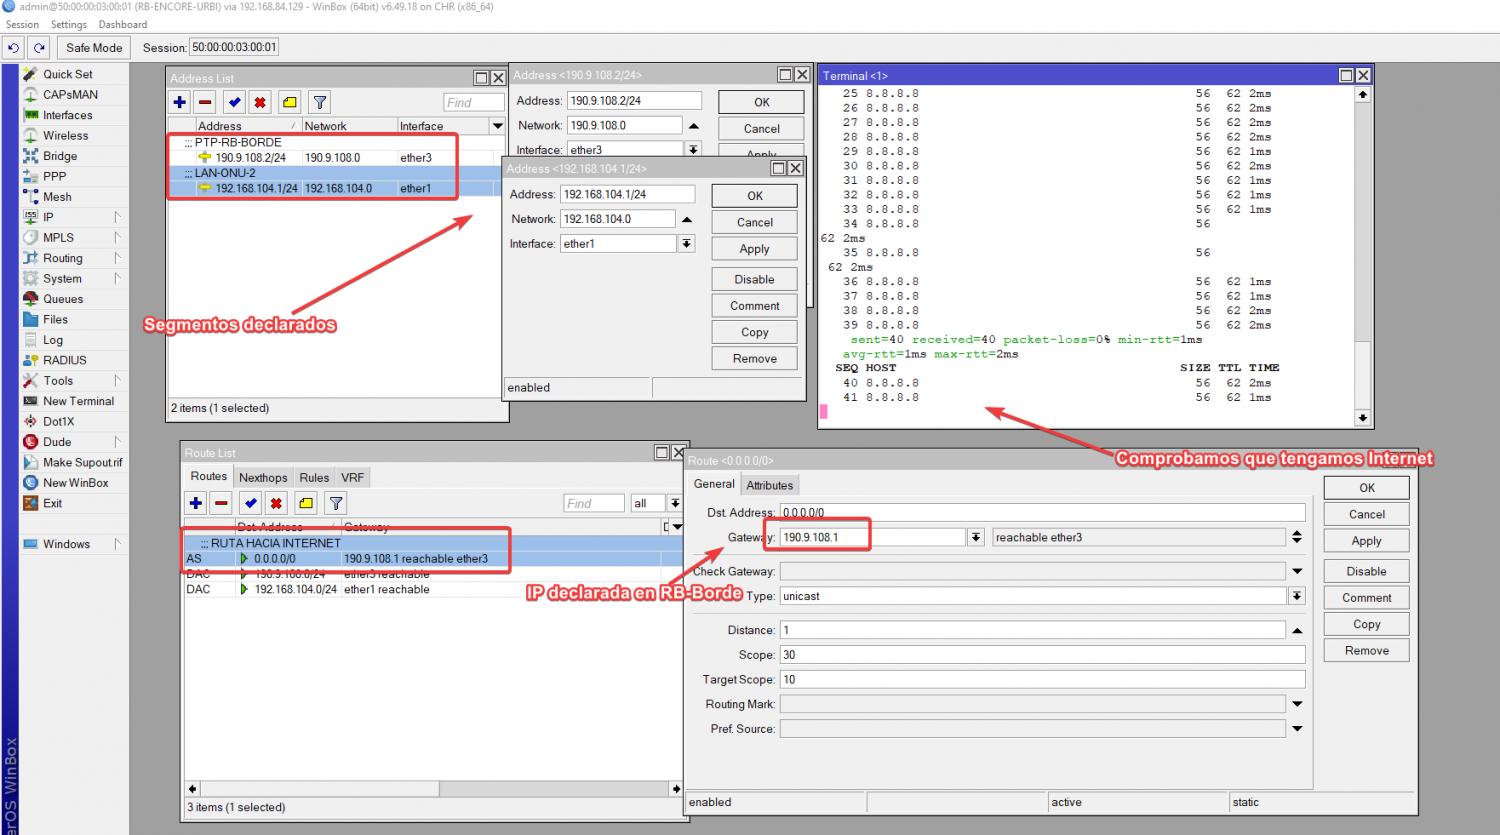
Agregamos las direcciones IPS,En mi caso utilizo una ip Privada PTP en el ether 3 para hacer la conexion con el ROUTER BORDE Y ether 1 para nuestras Lan que tendras nuestra ONU 1
Nota
Configuramos la ruta por defecto y comprobamos que tenga internet
Por comandos
/ip address

add address=190.9.108.2/24 comment=PTP-RB-BORDE interface=ether3 network=\

    190.9.108.0

add address=192.168.104.1/24 comment=LAN-ONU-2 interface=ether1 network=\

    192.168.104.0
Por interfaz
Nota
Configuramos el enmascaramiento sobre la interfaz ether 3
Entramos en el apartado IP/FIREWALL/NAT
Por comandos
/ip firewall nat
add action=masquerade chain=srcnat out-interface=ether3
Por interfaz
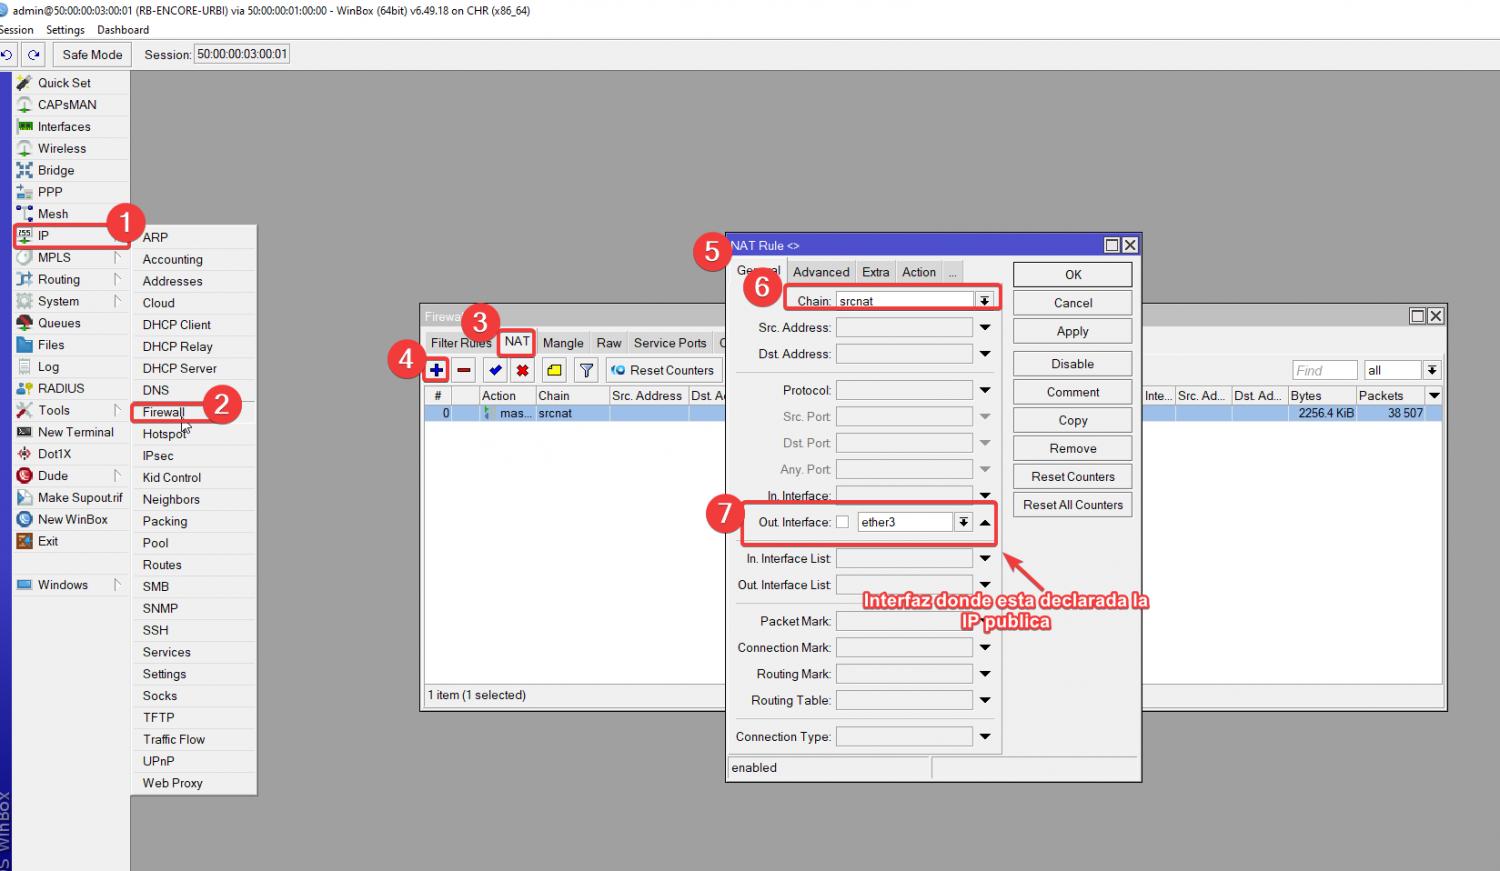
Elegimos en accion enmascaramiento
 PASO5 Configuración de la ONU 1
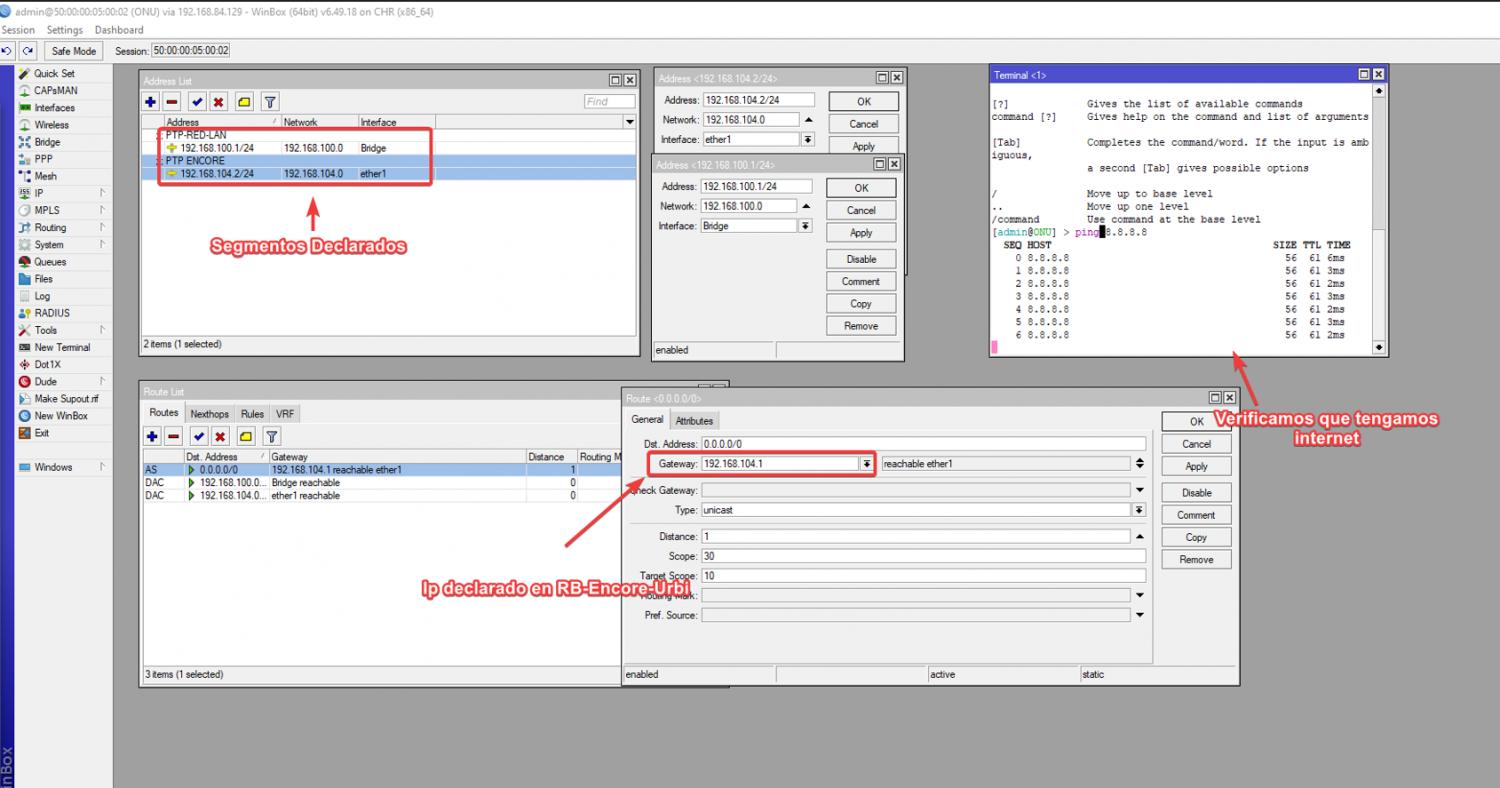
Agregamos una ip de la red de segmento que declaramos en Ether 3 de nuestro ROUTER ENCORE-URBI Y añadimos una red LAN, En mi caso estoy simulando la red por defecto de la onu
Nota
Configuramos la ruta por defecto
Por comandos
/ip address

add address=192.168.104.2/24 comment="PTP ENCORE" interface=ether1 network=\

    192.168.104.0

add address=192.168.100.1/24 comment=PTP-RED-LAN interface=Bridge network=\

    192.168.100.0

    /ip route

add distance=1 gateway=192.168.104.1
Por interfaz
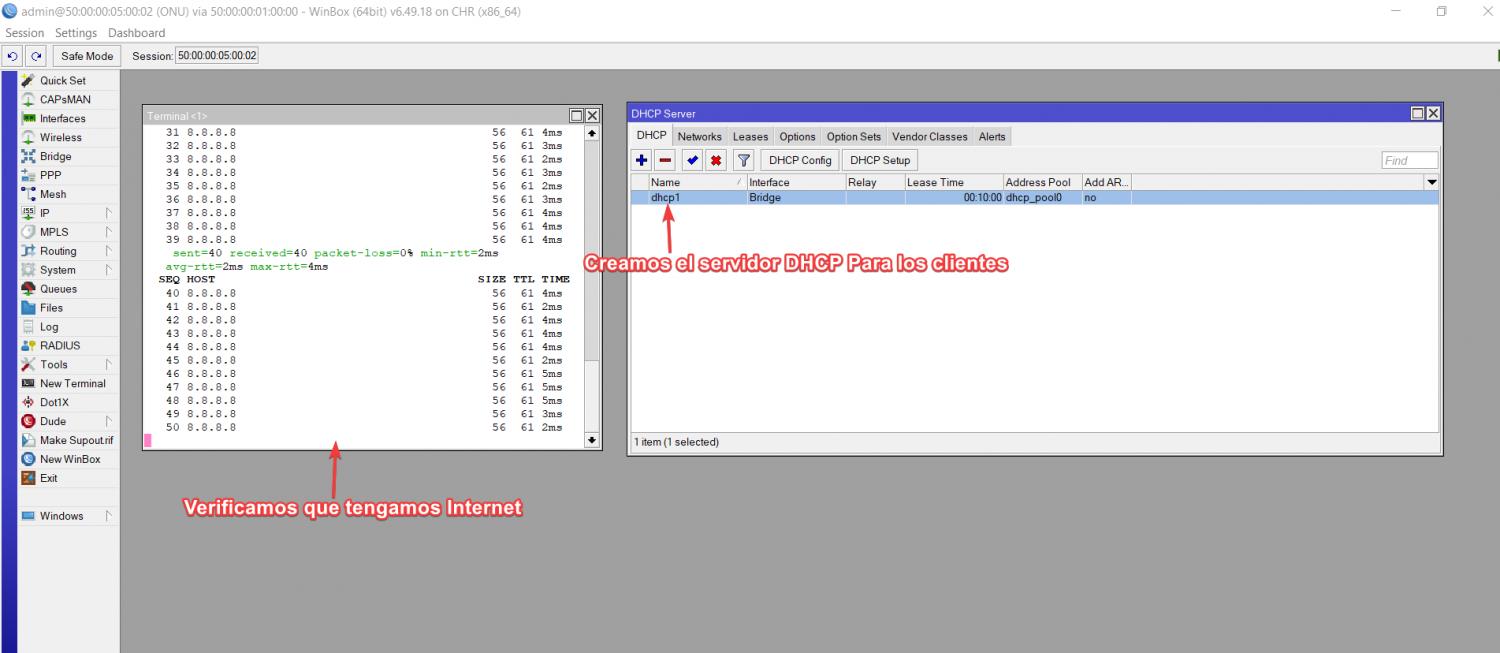
 Ahora vamos a configurar un servidor DHCP para que este pueda entregar las IPs privadas a los usuarios finales
Nota
Comprobamos que tengamos Internet
 Paso 5.1 Configuramos el usuario A
Entramos a la configuracion de red de la pc y elegimos la opcion DHCP

Verificamos que IP nos entrega el servidor

Nota
Comprobamos el ping y listo
SCRIPTS
ROUTER GOOGLE
/interface wireless security-profiles

set [ find default=yes ] supplicant-identity=MikroTik

/routing bgp instance

set default as=700

/ip address

add address=8.8.8.7/24 comment=PTP-GOOGLE interface=ether1 network=8.8.8.0

add address=10.20.50.1/30 comment=PTP-RB-BORDE interface=ether2 network=\

    10.20.50.0

/ip dhcp-client

add disabled=no interface=ether1

/routing bgp network

add network=8.8.8.0/24 synchronize=no

/routing bgp peer

add name=peer-to-RB-BORDE remote-address=10.20.50.2 remote-as=100

/system identity

set name=RB-GOOGLE

/tool romon

set enabled=yes
ROUTER BORDE
/interface wireless security-profiles

set [ find default=yes ] supplicant-identity=MikroTik

/routing bgp instance

set default as=100

/ip address

add address=10.20.50.2/30 comment="PTP RB-GOOGLE" interface=ether2 network=\

    10.20.50.0

add address=190.9.109.1/24 comment=PTP-ENCORE-MILAGRO interface=ether4 \

    network=190.9.109.0

add address=190.9.108.1/24 comment=PTP-ENCORE-URBI interface=ether3 network=\

    190.9.108.0

/ip dhcp-client

add disabled=no interface=ether1

/routing bgp network

add network=190.9.108.0/22 synchronize=no

/routing bgp peer

add name=peer-to-Google remote-address=10.20.50.1 remote-as=700

/system identity

set name=RB-BORDE

/tool romon

set enabled=yes
ENCORE-URBI
/interface wireless security-profiles

set [ find default=yes ] supplicant-identity=MikroTik

/ip address

add address=190.9.108.2/24 comment=PTP-RB-BORDE interface=ether3 network=\

    190.9.108.0

add address=192.168.104.1/24 comment=LAN-ONU-2 interface=ether1 network=\

    192.168.104.0

/ip dhcp-client

add disabled=no interface=ether1

/ip dns

set servers=8.8.8.8

/ip firewall nat

add action=masquerade chain=srcnat out-interface=ether3

/ip route

add comment="RUTA HACIA INTERNET" distance=1 gateway=190.9.108.1

/system identity

set name=RB-ENCORE-URBI

/tool romon

set enabled=yes
ENCORE-MILAGRO
/interface wireless security-profiles

set [ find default=yes ] supplicant-identity=MikroTik

/ip address

add address=190.9.109.2/24 comment=PTP-BORDE interface=ether4 network=\

    190.9.109.0

add address=192.168.104.1/24 comment=LAN-ONU-2 interface=ether1 network=\

    192.168.104.0

/ip firewall nat

add action=masquerade chain=srcnat out-interface=ether4

/ip dhcp-client

add disabled=no interface=ether1

/ip route

add distance=1 gateway=190.9.109.1

/system identity

set name=Encore-Milagro

/tool romon

set enabled=yes
ONU-1
/interface bridge

add name=Bridge

/interface wireless security-profiles

set [ find default=yes ] supplicant-identity=MikroTik

/ip pool

add name=dhcp_pool0 ranges=192.168.100.2-192.168.100.254

/ip dhcp-server

add address-pool=dhcp_pool0 disabled=no interface=Bridge name=dhcp1

/interface bridge port

add bridge=Bridge interface=ether2

add bridge=Bridge interface=ether3

/ip address

add address=192.168.104.2/24 comment="PTP ENCORE" interface=ether1 network=\

    192.168.104.0

add address=192.168.100.1/24 comment=PTP-RED-LAN interface=Bridge network=\

    192.168.100.0

/ip dhcp-client

add disabled=no interface=ether1

/ip dhcp-server network

add address=192.168.100.0/24 dns-server=8.8.8.8 gateway=192.168.100.1

/ip firewall nat

add action=masquerade chain=srcnat out-interface=ether1

/ip route

add distance=1 gateway=192.168.104.1

/system identity

set name=ONU

/tool romon

set enabled=yes
Archivos descargables
Aqui puedes decargar el laboratorio
_Exports_unetlab_export-20250502-222350.zip

 Gracias:
  Me agrada:
  Me desagrada:


 Citar
Citar